
This page will guide you through on how to add a Fortnox integration to your myOGO account
Note! If you are looking to take this integration into use, please contact service@ogoship.com first to talk more on details!
On this page
- Installing the integration
- Synchronizing products
- Setting up shipping methods
- Tips & OGOship recommendations for settings
In order to connect the integration, you have to grant myOGO access to your Fortnox. There are also additional settings that should be configured for the integration to be successful, those settings are listed below.
Installing the integration
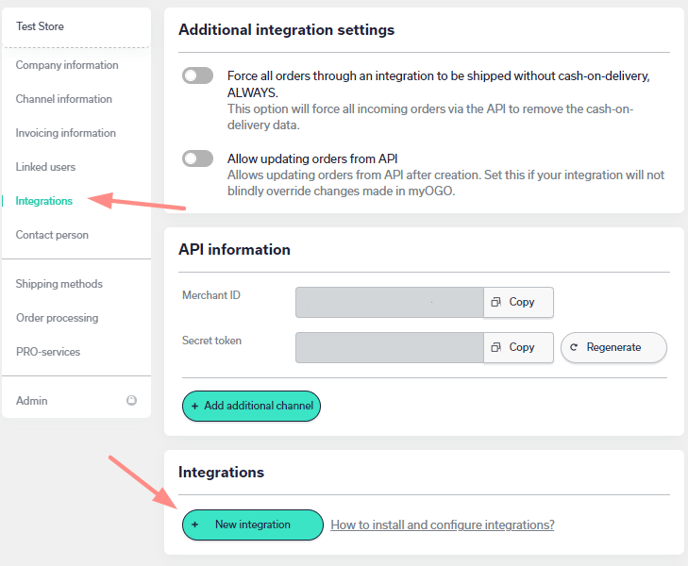
- Go to Edit Merchant → Integrations
- Click on New Integration
- Select Fortnox
- You will be redirected to Fortnox login site
- Log in and grant OGOship access to listed endpoints.
- Integration is now added to myOGO
- Select the warehouse to be used
- Adjust the settings
- It is advised to set the First order date, especially if you have had any earlier integrations. Orders will be searched from that day onward
- Ignore products missing from OGOship option is NOT advised to be used with Fortnox. If products are ignored, the invoice will be created without those missing products.
Synchronizing products
Stock Location field determines which products are synced by myOGO. If the field is left empty, myOGO searches all the products in Fortnox. If you want to specify the products to be synced with myOGO you can do it by creating a stock location in Fortnox and adding the Stock location ID to Stock Location field in myOGO.
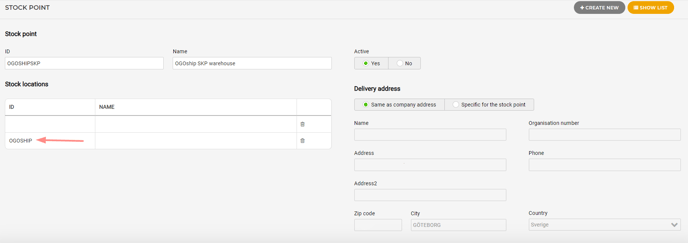
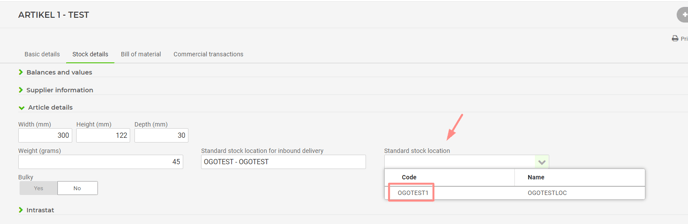
To determine which products are included in the selected stock location go to product's Stock details page in Fortnox and select relevant Standard stock location.
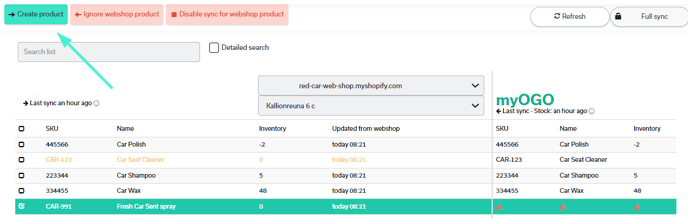
Once you have set up the locations, you may sync the products to myOGO, go to the Products → Sync webshop products. If the products are not yet visible, click Refresh.
When the products are visible on the left side of the page, click on all, or the desired products, and select Create product. Read more about the product sync page.
Setting up shipping methods
Now that you have your integration set as well with products created next you need to connect the shipping methods from your Fortnox to myOGO.
You can manage your Fortnox shipping methods from Settings → QUOTE/ORDER → Delivery method and delivery terms. Once you have those setup, copy the delivery CODE you want to link as a shipping method in myOGO. Please find the detailed guide for shipping method configuration here. 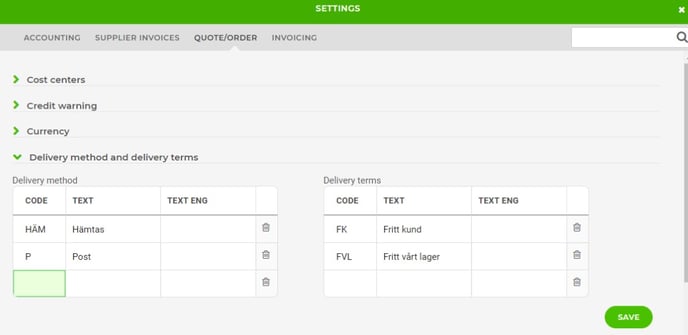
Tips & OGOship recommendations for settings
Order flow Fortnox → myOGO → Fortnox
To better understand the order flow, here is a step-by-step overview of how the fulfillment works. Also, a few settings have to be configured correctly to enable automatic fulfillment.
- First, the order is created in Fortnox with all the details the order needs.
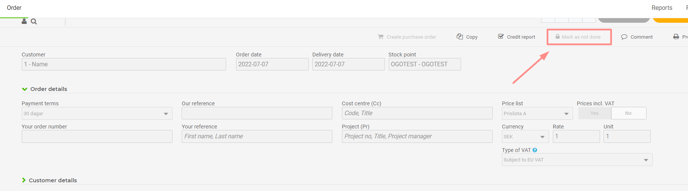
- When the order is marked as done (UI shows "Mark as not done" in order's page), myOGO will create the order from Fortnox.
- The order is checked for general requirements. (f.e. all the order lines must exist in myOGO).
- OGOship will validate the order before creating it into the warehousesWMS.
- If order validation was a success, the order will be sent to the warehouse and shipped to the customer. If validations didn't go through, the order will be put to RESERVED status in myOGO until issues are being manually solved.
- Once the order has been shipped, myOGO will update delivered quantities to the order in Fortnox.
- myOGO creates an invoice automatically based on the invoicing information that has been set to the order in Fortnox, which will set the order's delivery done field as true based on Fortnox's warehouse setting detailed below.
Mark as done -option can be found in the upper corner in order's details. The order is marked as done if the UI shows Mark as not done.
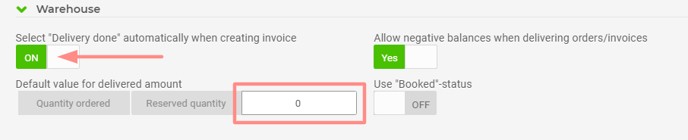
In order to enable automatic fulfillment, "Select 'Delivery done' automatically when creating invoice" should be turned On. It can be found in Fortnox from Settings → QUOTE/ORDER → Warehouse.
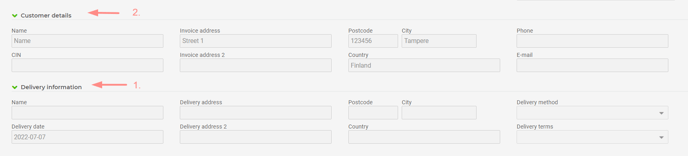
When determining order's delivery address myOGO first looks for the Delivery Information → Name field. If that is empty, the delivery information is filled with data from Customer details section instead of Delivery Information section.
Avoiding unwanted backorders
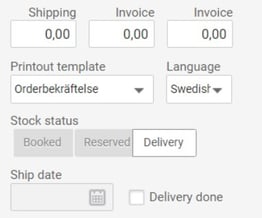
When fulfilling the orders myOGO tries to update the delivered quantity to match the ordered quantity for each order line.
Updating ordered quantity is only possible if orders Stock status is set to value Delivery AND Delivery done has not been checked. Before the order gets transferred to OGO, these two settings should be as in the picture below. They should remain in these states so that the order can be fulfilled properly after shipping.
If you are working with Fortnox API Stock status: Delivery in UI corresponds to "DeliveryState" = 0 in API
If when fulfilling an order myOGO can not update the delivered quantities for the reasons detailed above or they do not match with the ordered quantities, Fortnox will create a backorder automatically for the order's missing delivered quantities. This will happen even if otherwise order would be fulfilled in OGO correctly. To avoid this, make sure that the fields mentioned above have the correct values.