
This page will guide you through on how to add a WooCommerce integration to your myOGO account with a few simple steps!
Please note! that Woocommerce version minimum requirement is Woocommerce 4.5.
On this page
- Installing the integration
- Integration
- Plugin
- Synchronizing products
- Setting up shipping methods
- OGOship Tips
There are two ways to integrate WooCommerce to myOGO; by installing the integration on the myOGO site or by installing the plugin in WooCommerce. To get best experience, it is needed to install plugin and the integration, so all of the features are available to use. The differences between these integrations are listed below. Key features marked in bold.
Plugin |
Integration |
|
|
Installing the integration
First, you need to create a Consumer key and Consumer secret in WooComerce.
- Go to WooCommerce
- Then go to WooCommerce → Settings → Advanced
- Click on REST API
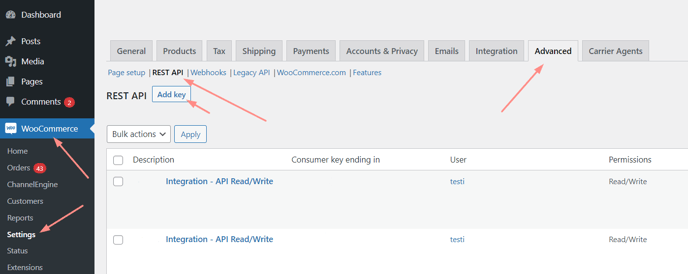
- Click Add key to create new API key
- Give the key a name, description and give the permission to read and write.
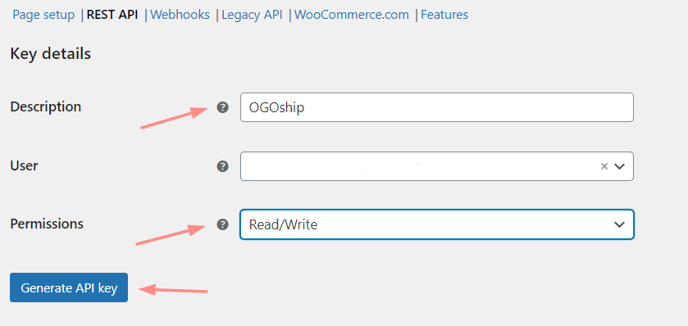
- Then click Generate API key
- Copy and save the Consumer key and Consumer secret
- Note! They can not be accessed again
- Next, get your site URL from the Settings page
Next you may add the integration to myOGO
- Go to Edit Merchant → Integrations
- Click on New Integration
- Choose WooCommerce
- Fill in the Store Url, Consumer key and Consumer secret
- Save
- Select the warehouse to be used
- Adjust the settings
If the integration somehow isn't working, please check the Legacy API. This setting needs to be enabled in order for the integration to work.
Make sure that by default the following settings in Settings → General are not selected. By default the integration will work as intended without these selected.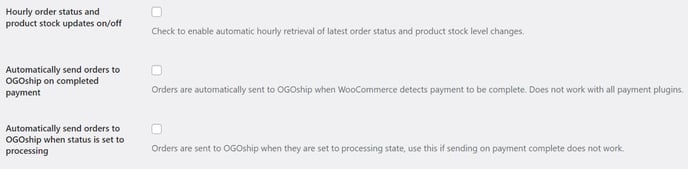
Installing the plugin
- Go to your Wordpress Market Place and search for OGOship plugin
- Install and activate it
- Next, go to your myOGO account to get your Merchant ID and Secret Token
- Go to Edit Merchant → Integrations
- Copy the merchant ID and Secret Token
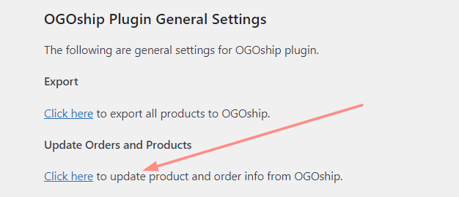
- Add them to WooCommerce general settings under "OGOship Plugin General Settings"
- Save
- It is highly recommended that you disable sending of orders to myOGO from plugin side. MyOGO is able to get more info from orders and support special pickup points etc.
Synchronizing products
Once the integration is set up, it's time to sync your products, go to the Products → Sync webshop products. If the products are not yet visible, click Refresh.
When the products are visible on the left side of the page, click on all, or the desired products, and select Create product. Read more about the product sync page.
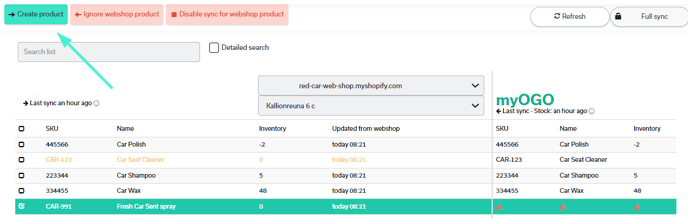
Note! If you don't want to send every product to OGOship, check the box Do not export to OGOship on the product page in WooCommerce. Also, make sure that all products have the setting Manage Stock "Enable stock management at product level" - selected.
If you are selling variable products, remember also to set a different SKU for each one. Otherwise, it won't transfer to myOGO.
Setting up shipping methods
Now that you have your integration set as well with products created next you need to connect the shipping methods from your online store to myOGO.
Once you have created the shipping methods to your online store, please find the detailed guide for shipping method configuration here.
OGOship tips
Verify plugin
Once you have goods in stock, you may verify the plugin with stock sync in WooCommerce, by clicking "upload product info from OGOship to WooCommerce" under OGOship Plugin General Settings.
Orders not syncing?
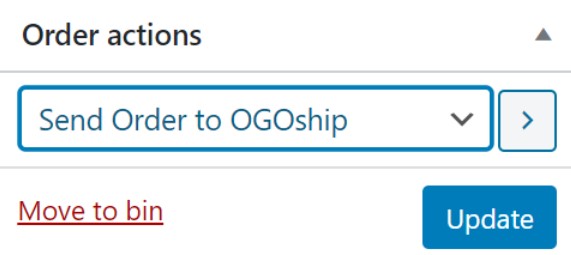
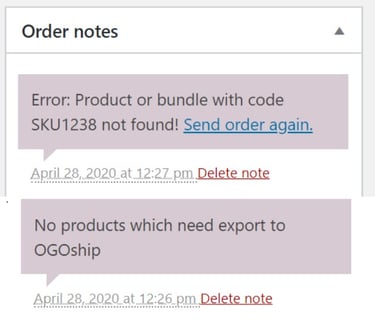
If the orders are not transferred to myOGO check the following settings in WooCommerce. Orders can be also sent manually to myOGO. If the order is not transferred to myOGO there will be an error message on the Order notes.
A common reason for order not transferring is, that
the ordered product has no SKU, or the setting on the product page Do not export to OGOship is on (see photo above). Also on the WooCommerce settings page the setting Automatically send orders to OGOship needs to be on.
Pickup / service point select plugins supported by myOGO integration:
- Budbee
- Schenker
- Posti
Note. We are able to support most of other plugins also. Just make a test order and send email to our support, and we will update integration.