
This page will guide you through on how to add a Magento integration to your myOGO account with a few simple steps!
Note! This integration supports 2.4 and later versions of Magento.
For further details on the needs and functions of myOGO ↔ Magento integration, please contact service@ogoship.com
On this page
- Installing the integration
- Integration settings
- API Address
- Order status codes
- EAN code attribute
- Store IDs
- Stock sync
Installing the integration
For the integration, you will need from Magento API Access Token and your Store URL.
- Log into Magento Admin
- Go to System → Extensions → Integrations
- Click Add New Integration to display the New Integration page
- Enter a unique name for the integration in the Name field
- Then enter your admin password in the Your Password field
- Leave all other fields blank
- Click the API tab
- The quick way is to select all fields in the following resources: Sales, Catalog and Stores
- A more specific list of needed fields is below in the section Minimum API permissions
- Click Save to save your changes and return to the Integrations page
- Click the Activate link on the newly-created integration
- Click Allow
- Copy the Access Token for later use
Minimum API permissions
In order for the integration to work properly, the following API permissions are needed. Read the description below in more detail on how these permissions are used. If these permissions are not granted, the described feature will not work.
- Under Sales in section Actions there are three recourses to be selected:
- View is needed to read orders
- Ship to create shipments
- Comment to add comments when the order is transferred to myOGO and also change the order's status if specified in integration settings
- Under Catalog > Inventory
- Permission for Products is needed to be able to read product data
- Under Stores > Inventory
- Permission for Sources is needed to be able to read different source locations and update product stock levels for the source
Next, you may add the integration to myOGO
- Go to Edit Merchant → Integrations
- Click on New Integration
- Choose Magento
- Fill in the Store Url and Access Token
- Save
- Select the warehouse to be used
- Adjust the settings
Integration settings
Shop URL
For the shop URL field please add in your full API address. For example https://www.OGOship.fi/rest/default/V1.
Order status codes
By default, Magento won't have a status for partially shipped orders and orders transferred to myOGO.
- Open orders - This is to identify the order status when the order should be synced into myOGO for shipping. Default is Processing, but you may add multiples divided by a comma.
- Orders transferred to myOGO - If you wish to identify a specified status for orders once they have been synced to myOGO you may add that one here.
- Partially shipped - This is to add custom status for partially shipped orders, if you have chosen to split the order in myOGO you can customize the status in Magento meanwhile the back order waits to be shipped.
These statuses can be created and linked to myOGO by following these steps. First do steps 1-4 for both statuses. Once they are created and licked, the statuses will sync automatically to Magento.
- In Magento from the left admin menu select STORES and under the Stores menu, select Order Status
- From the top right corner, click Create New Status
- Fill in the code in the Status Code field you want to use (f.e. "TransferredToMyogo" and "PartiallyShipped").
- Don’t use spaces or special characters in the name
- Then fill in the Status Label, which is shown as a statuses name in the Magento.
- Labels can hold white spaces and special characters
- From the top right corner click Save Status
- Then go into myOGO integration settings
- Edit merchant → Integrations
- Fill in the status codes you just created to their appropriate fields
EAN code attribute
To add new attributes in Magento follow the steps below
- Navigate to STORES and under Attributes click Products
- On the Product Attributes page select Add New Attribute
- In the Attribute Properties section fill in "EAN code" to the Default Label field
- In the Advances Attribute Properties section give the attribute the code f.e. "eancode".
- All the other options should stay as they are by default
- Then go into myOGO integration settings
- Edit merchant → Integrations
- Fill in the status code you just created in the EAN / barcode attribute field
Store ID's
If you have multiple markets/stores under the same Magento and API, you can determine what stores OGOship should read to myOGO. Just list all needed store IDs to this field, separated by a comma.
Stock sync
Depending on your Magento stock settings, you can choose two options in myOGO integrations settings.
- The setting called: Magento automatically decreases the stock level?
- Select here YES/NO
Synchronizing products
Note! All products need to be assigned to a source that is used for OGOship. It can be default or a specific source added for myOGO.
Once the integration is set up, it's time to sync your products, go to the Products → Sync webshop products. If the products are not yet visible, click Refresh.
When the products are visible on the left side of the page, click on all, or the desired products, and select Create product. Read more about the product sync page.
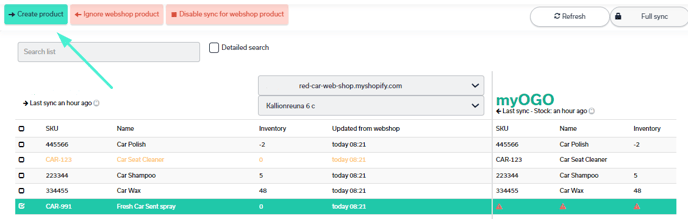
When the physical products arrive at the warehouse, the stock amounts will be visible in both myOGO and the online store.
Setting up shipping methods
Now that you have your integration set as well with products created next you need to connect the shipping methods from your online store to myOGO.
Once you have created the shipping methods for your online store, please find the detailed guide for shipping method configuration here.
Pickup point codes with Magento integration
If you offer shipping methods on your checkout where the customer can choose the pick-up point locker code for delivery, please make sure that the pickup point code is added to the shipping_description field after the delivery type name separated by |.
For example
- Omniva - Tallinna Viru Bussiterminali pakiautomaat | EE096104
- Omniva - Tallinna Viru Bussiterminali pakiautomaat - Is the parcel machine name aka the delivery type name
- EE096104 - Is the pickup point code