
This guide will support you through the process of setting up OGOship tracking.
Introduction
Welcome to OGOship Returns! In the ever-evolving world of e-commerce, efficient and transparent return processes are essential. OGOship Returns offers a streamlined return experience for both merchants and consumers, regardless of their location or the shipping company in use. This guide will walk you through the features and how to make the most of them.
Overview
- Returns are automatically created in myOGO with a return reason from customer.
- Once the return arrives at the specific warehouse, the return handler marks it as returned.
- Merchants can receive notifications from myOGO about returned orders if the Order returned notification is enabled, enabling them to process refunds. See more about notifications from here.
- OGOship tracking has to be used in order to use OGOship returns
Supported Shipping Methods
Here's a list of supported shipping methods compatible with OGOship Returns:
- SKP
- DHL Service Point (domestic)
- DHL Parcel Connect (EU)
- DHL Express (EU, non-EU)
- JKT
- Posti (domestic)
- GLS EuroBusinessParcel (EU) drop-off
- DHL Express (EU, non-EU)
- TLL
- Posti (domestic)
- GLS EuroBusinessParcel (EU) drop-off
- DHL Express (EU, non-EU)
- PLN
- GLS EuroBusinessParcel (EU) pick-up
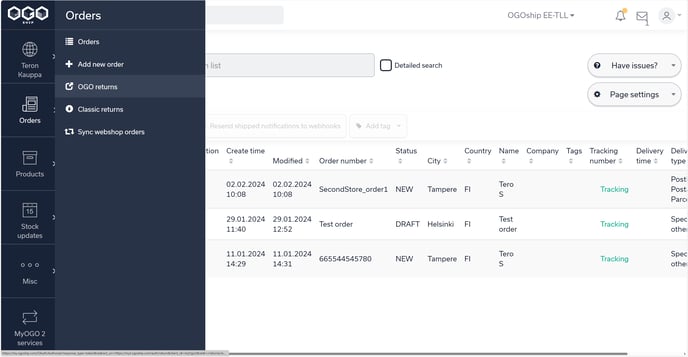
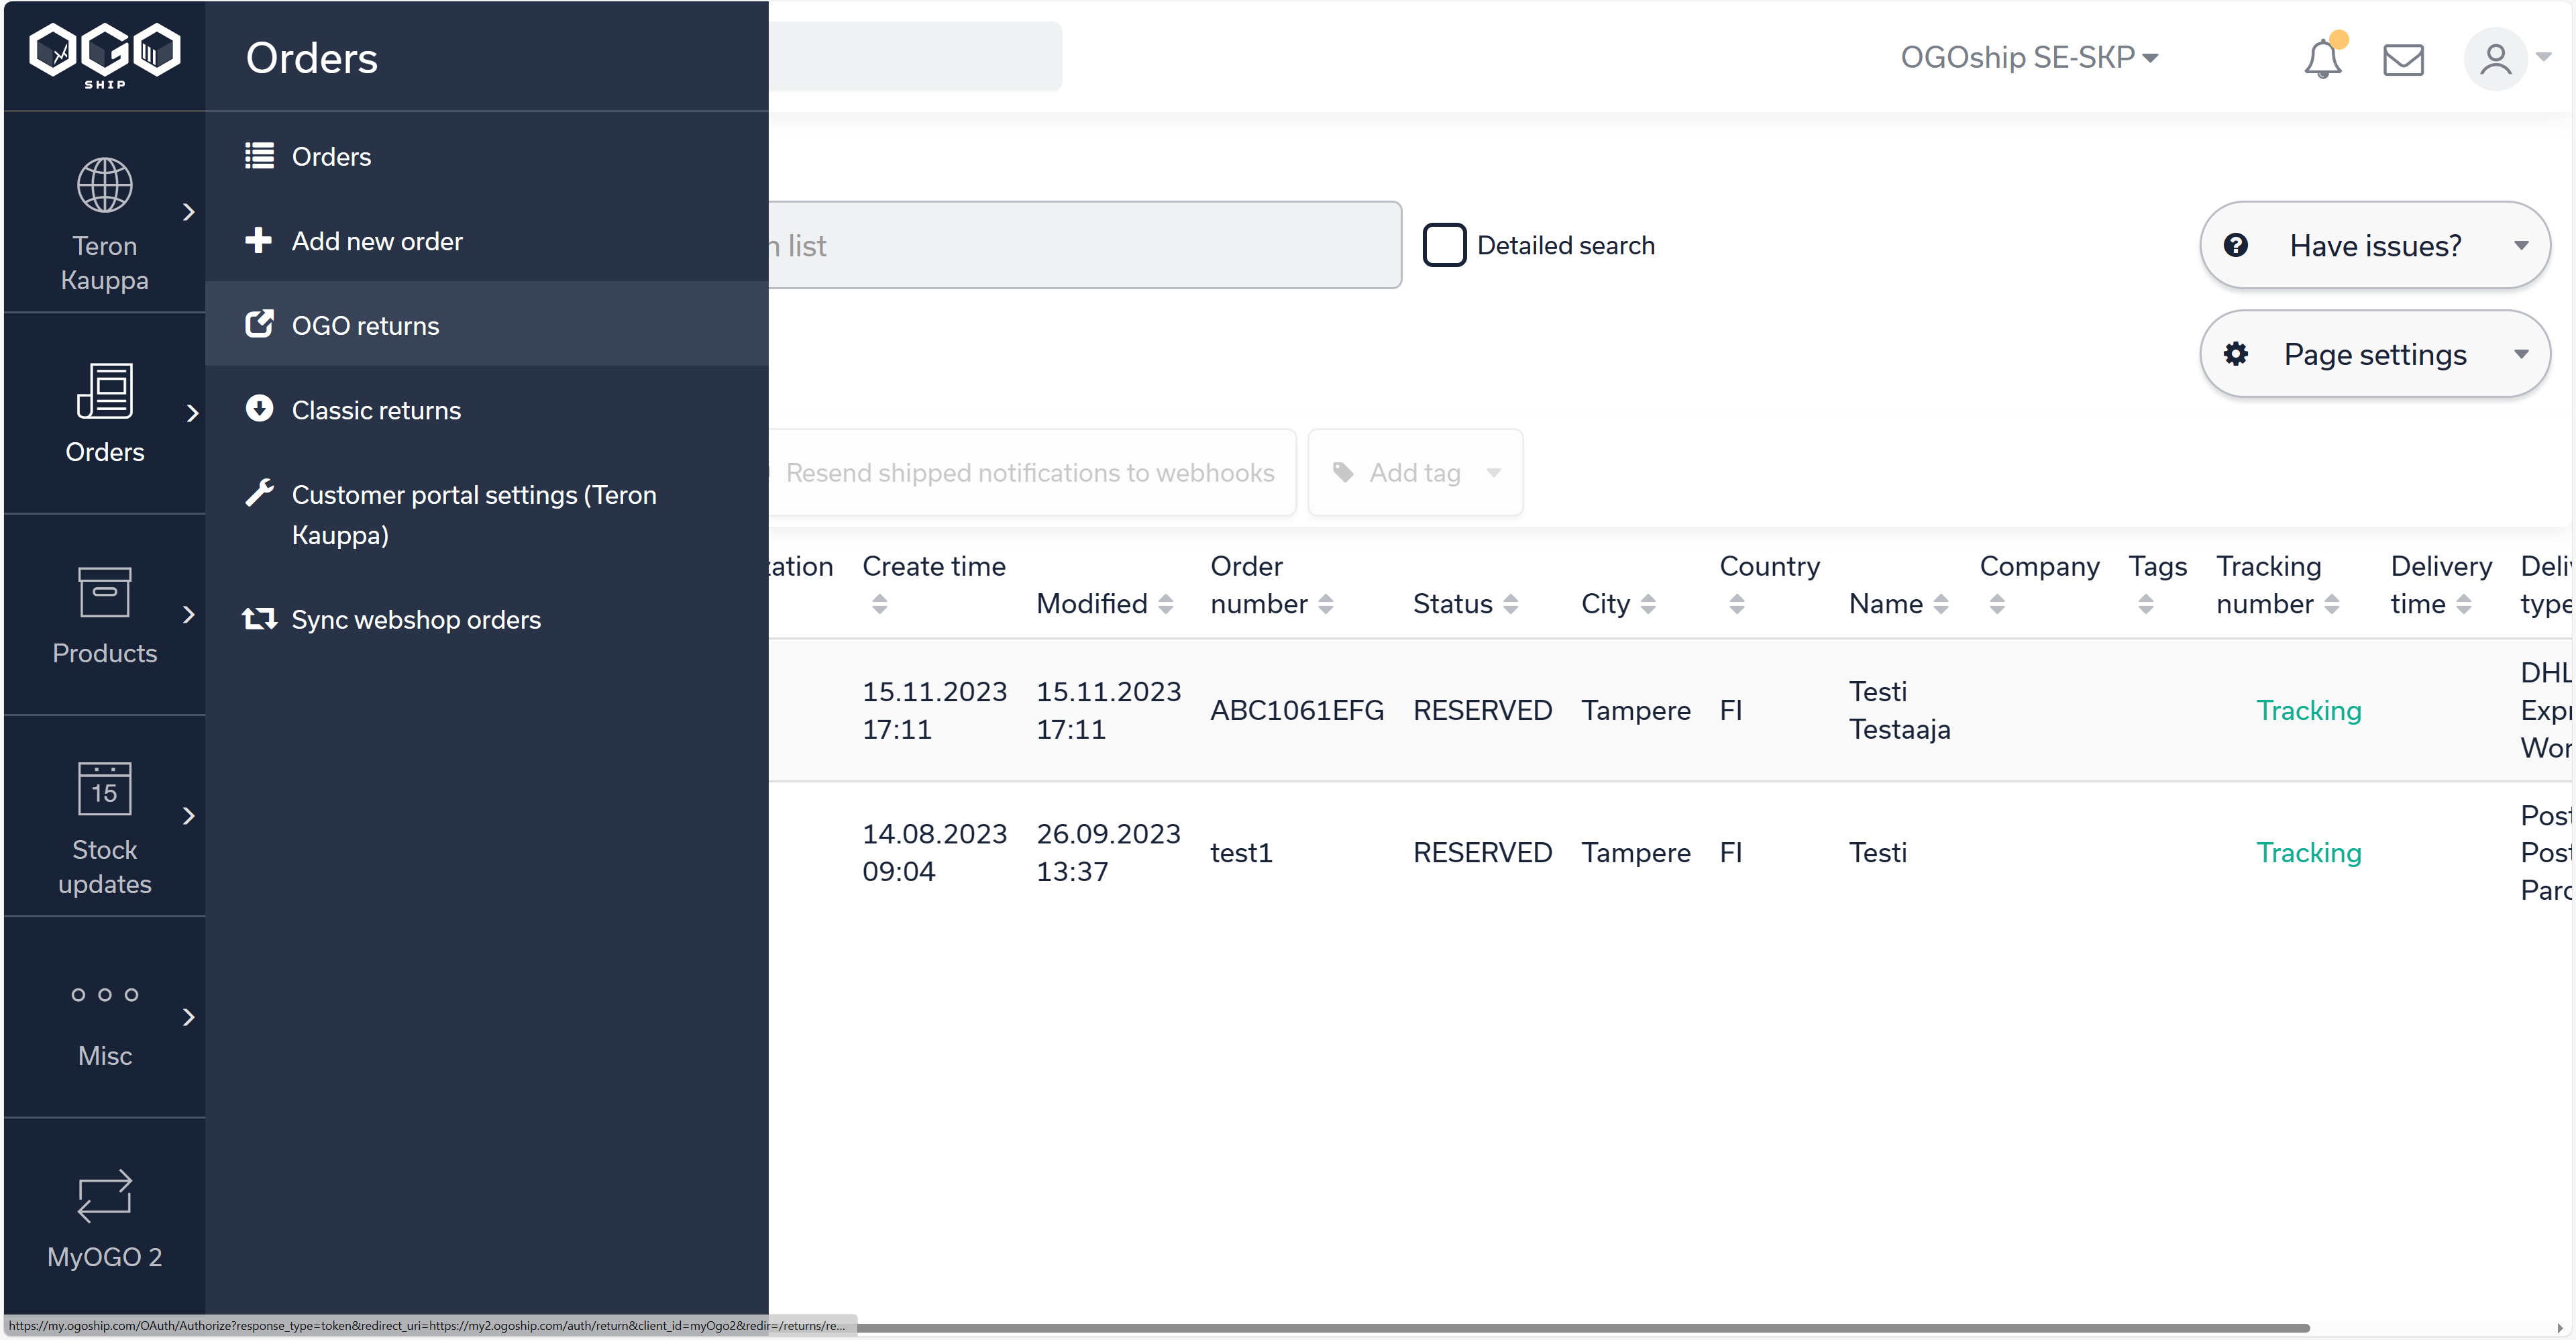
1. Accessing the Returns Portal
To access the OGOship Returns portal tracking view, follow these steps:
- Navigate to myOGO.
- In the left-hand navigator, click on the OGO returns or the myOGO 2 services to acccess the returns portal settings
Growth and Enterprise Plans:
- On the customer portal settings page under Post-purchase, you modify how the tracking page looks like for end consumers
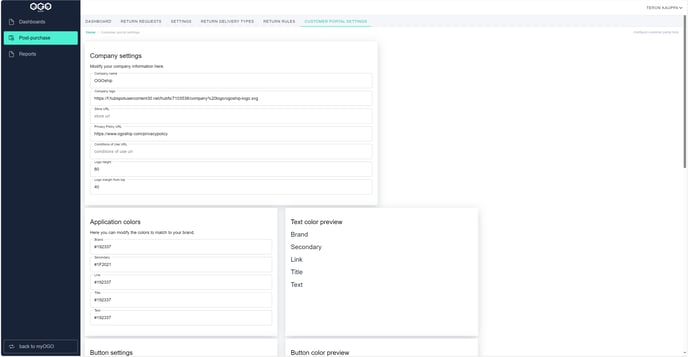
- Note: The order status widget, order tracking widget, carrier details widget, and products widget cannot be modified. However, other widgets can be edited, deleted, or new ones added.
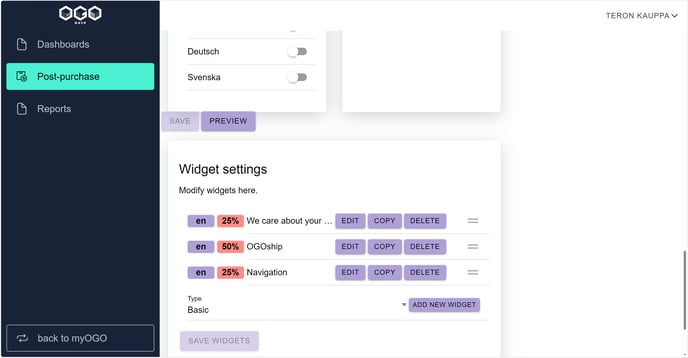
- If you've enabled multiple languages , remember to modify widgets for each language separately from the Widget settings
- Check preview to see how the page looks like. Remember to save the settings and Save widgets from the separate buttons if you have modified those
Free Plan:
With the free version, you can hide widgets and only modify the blog widget.
3. Detailed Admin settings:
- Company Settings: Add your company name, logo, store URL, privacy policy URL, conditions of use URL, and adjust the logo's appearance.
- Application Colors & Button Settings: Customize the colors and appearance of various elements on the page.
- Language: Enable or disable return page languages. Customize each enabled language page widgets.
- Additional Settings: Adjust the font and widget appearance.
- Widget settings: Edit, copy, hide, delete or add new widget and choose the widget type.
4. Post-purchase services
- Navigate to myOGO.
- The return settings can be entered via Orders - OGO returns or from the myOGO 2 button from bottom left on the menu. This redirects the user to myogo2, where the setting page is located. You can also access this from the bottom left myOGO 2 menu.
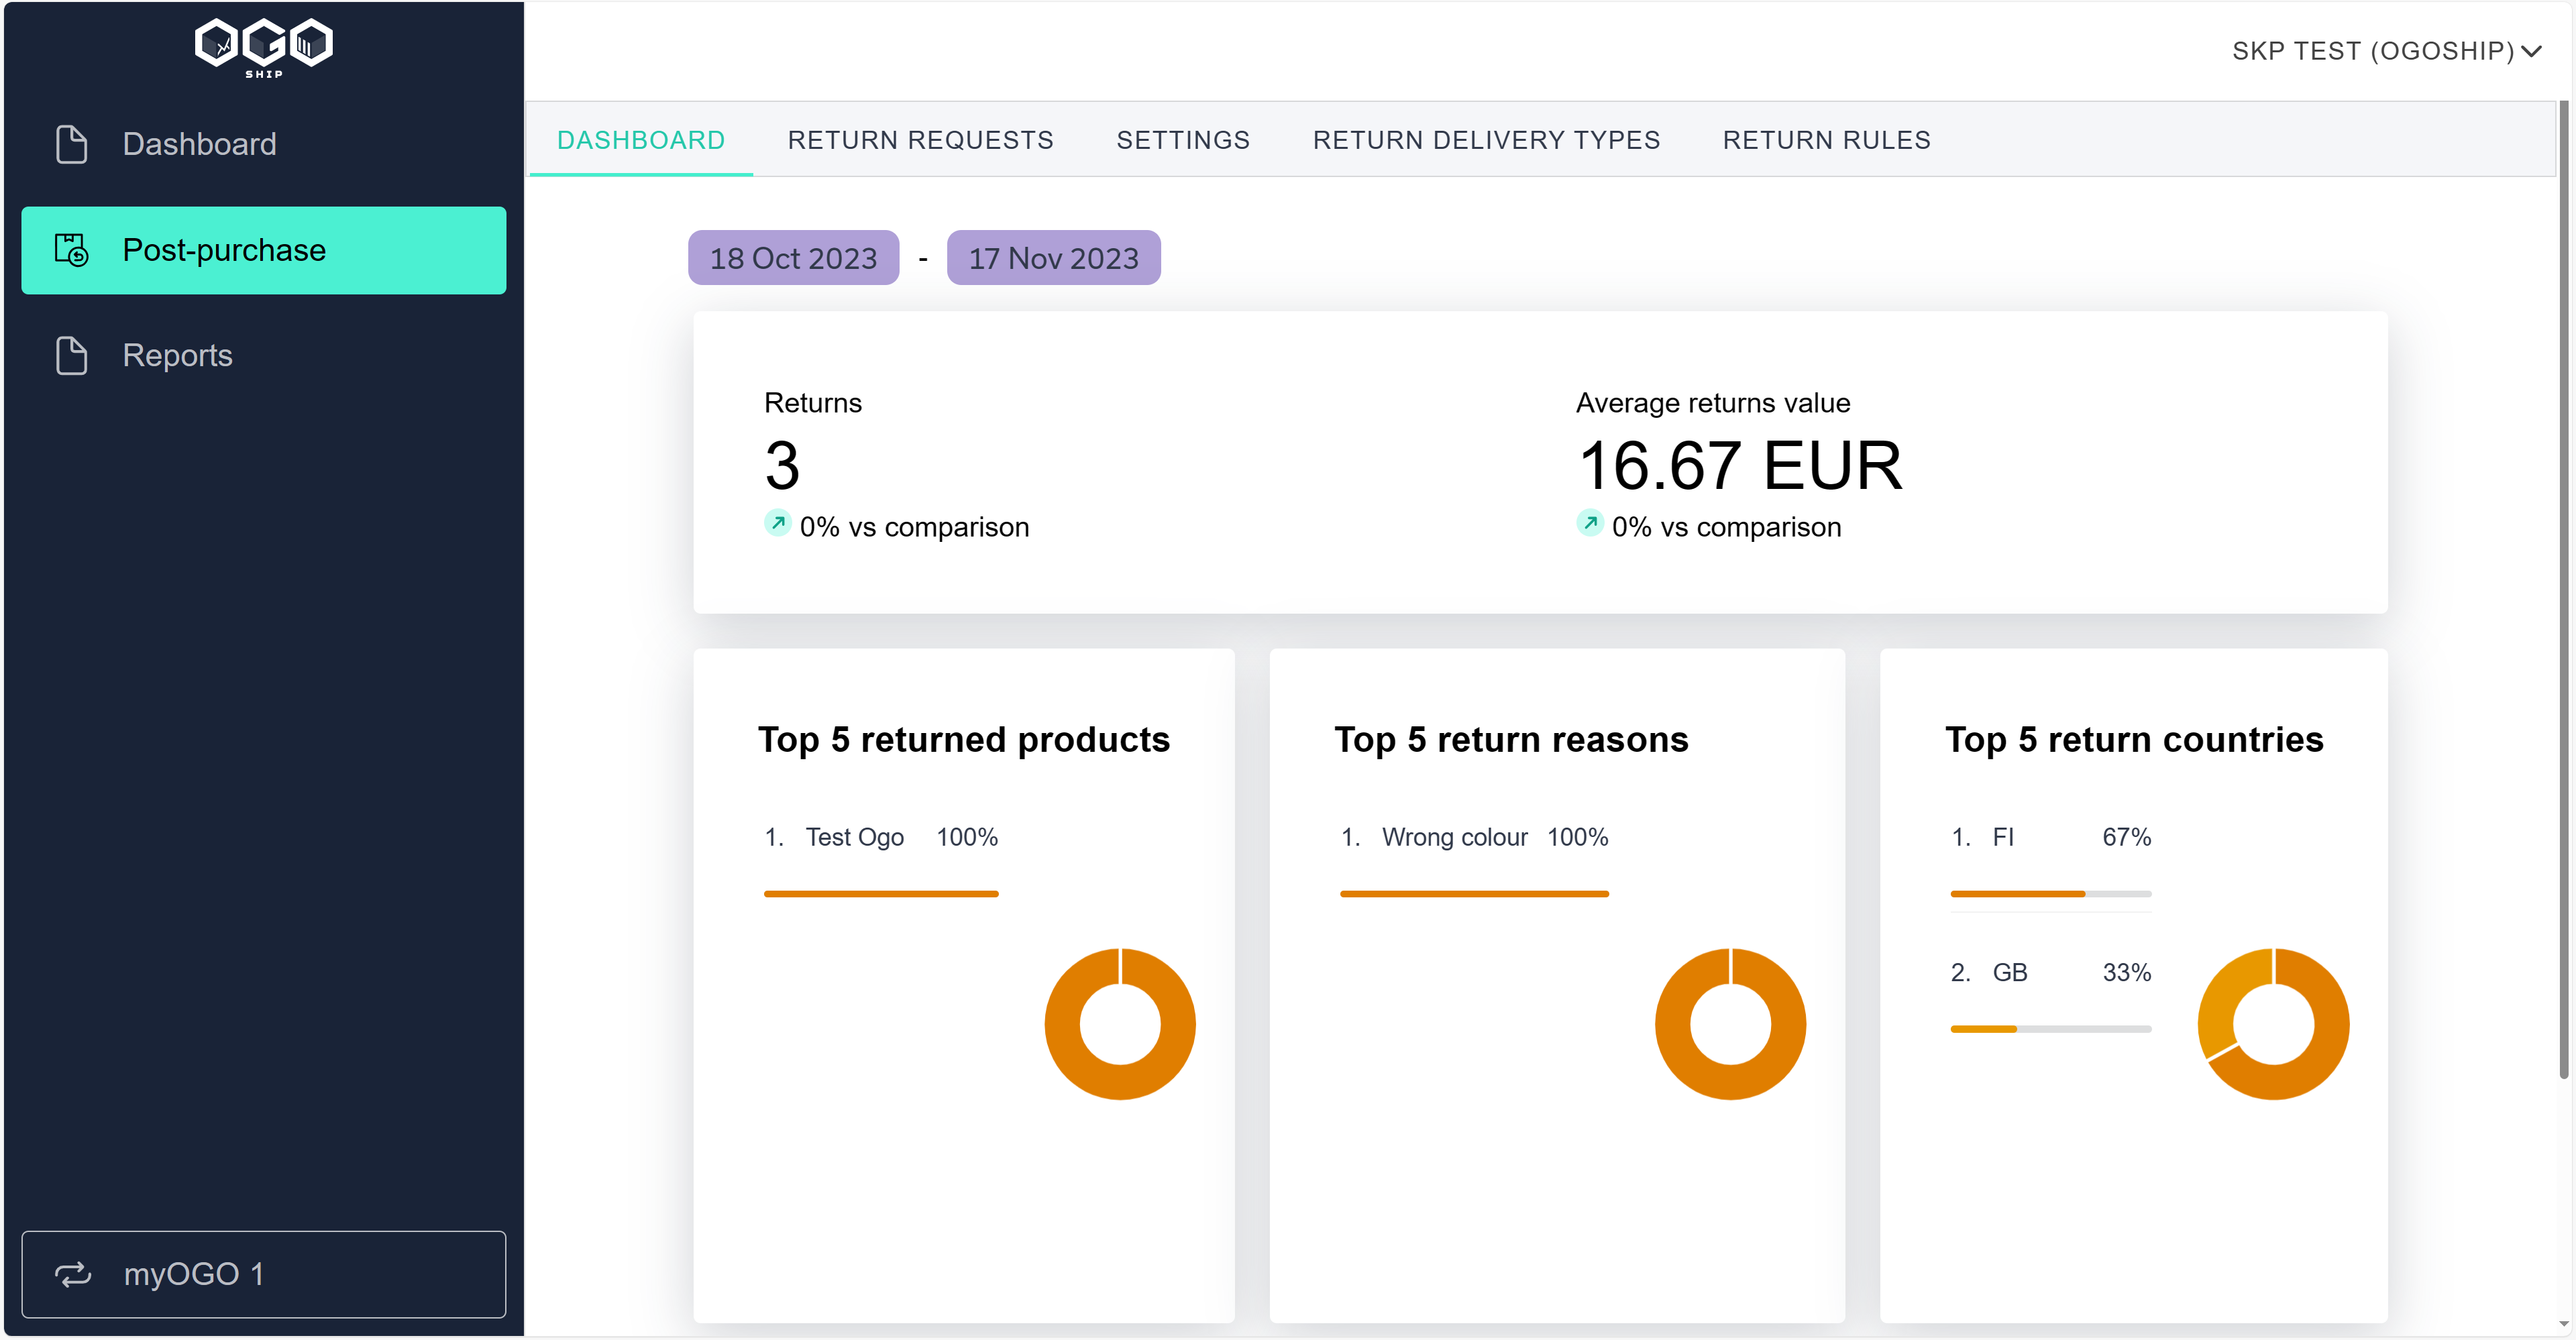
- Choose Post-purchase from the left menu. The dashboard shows useful information about all your returns in general.
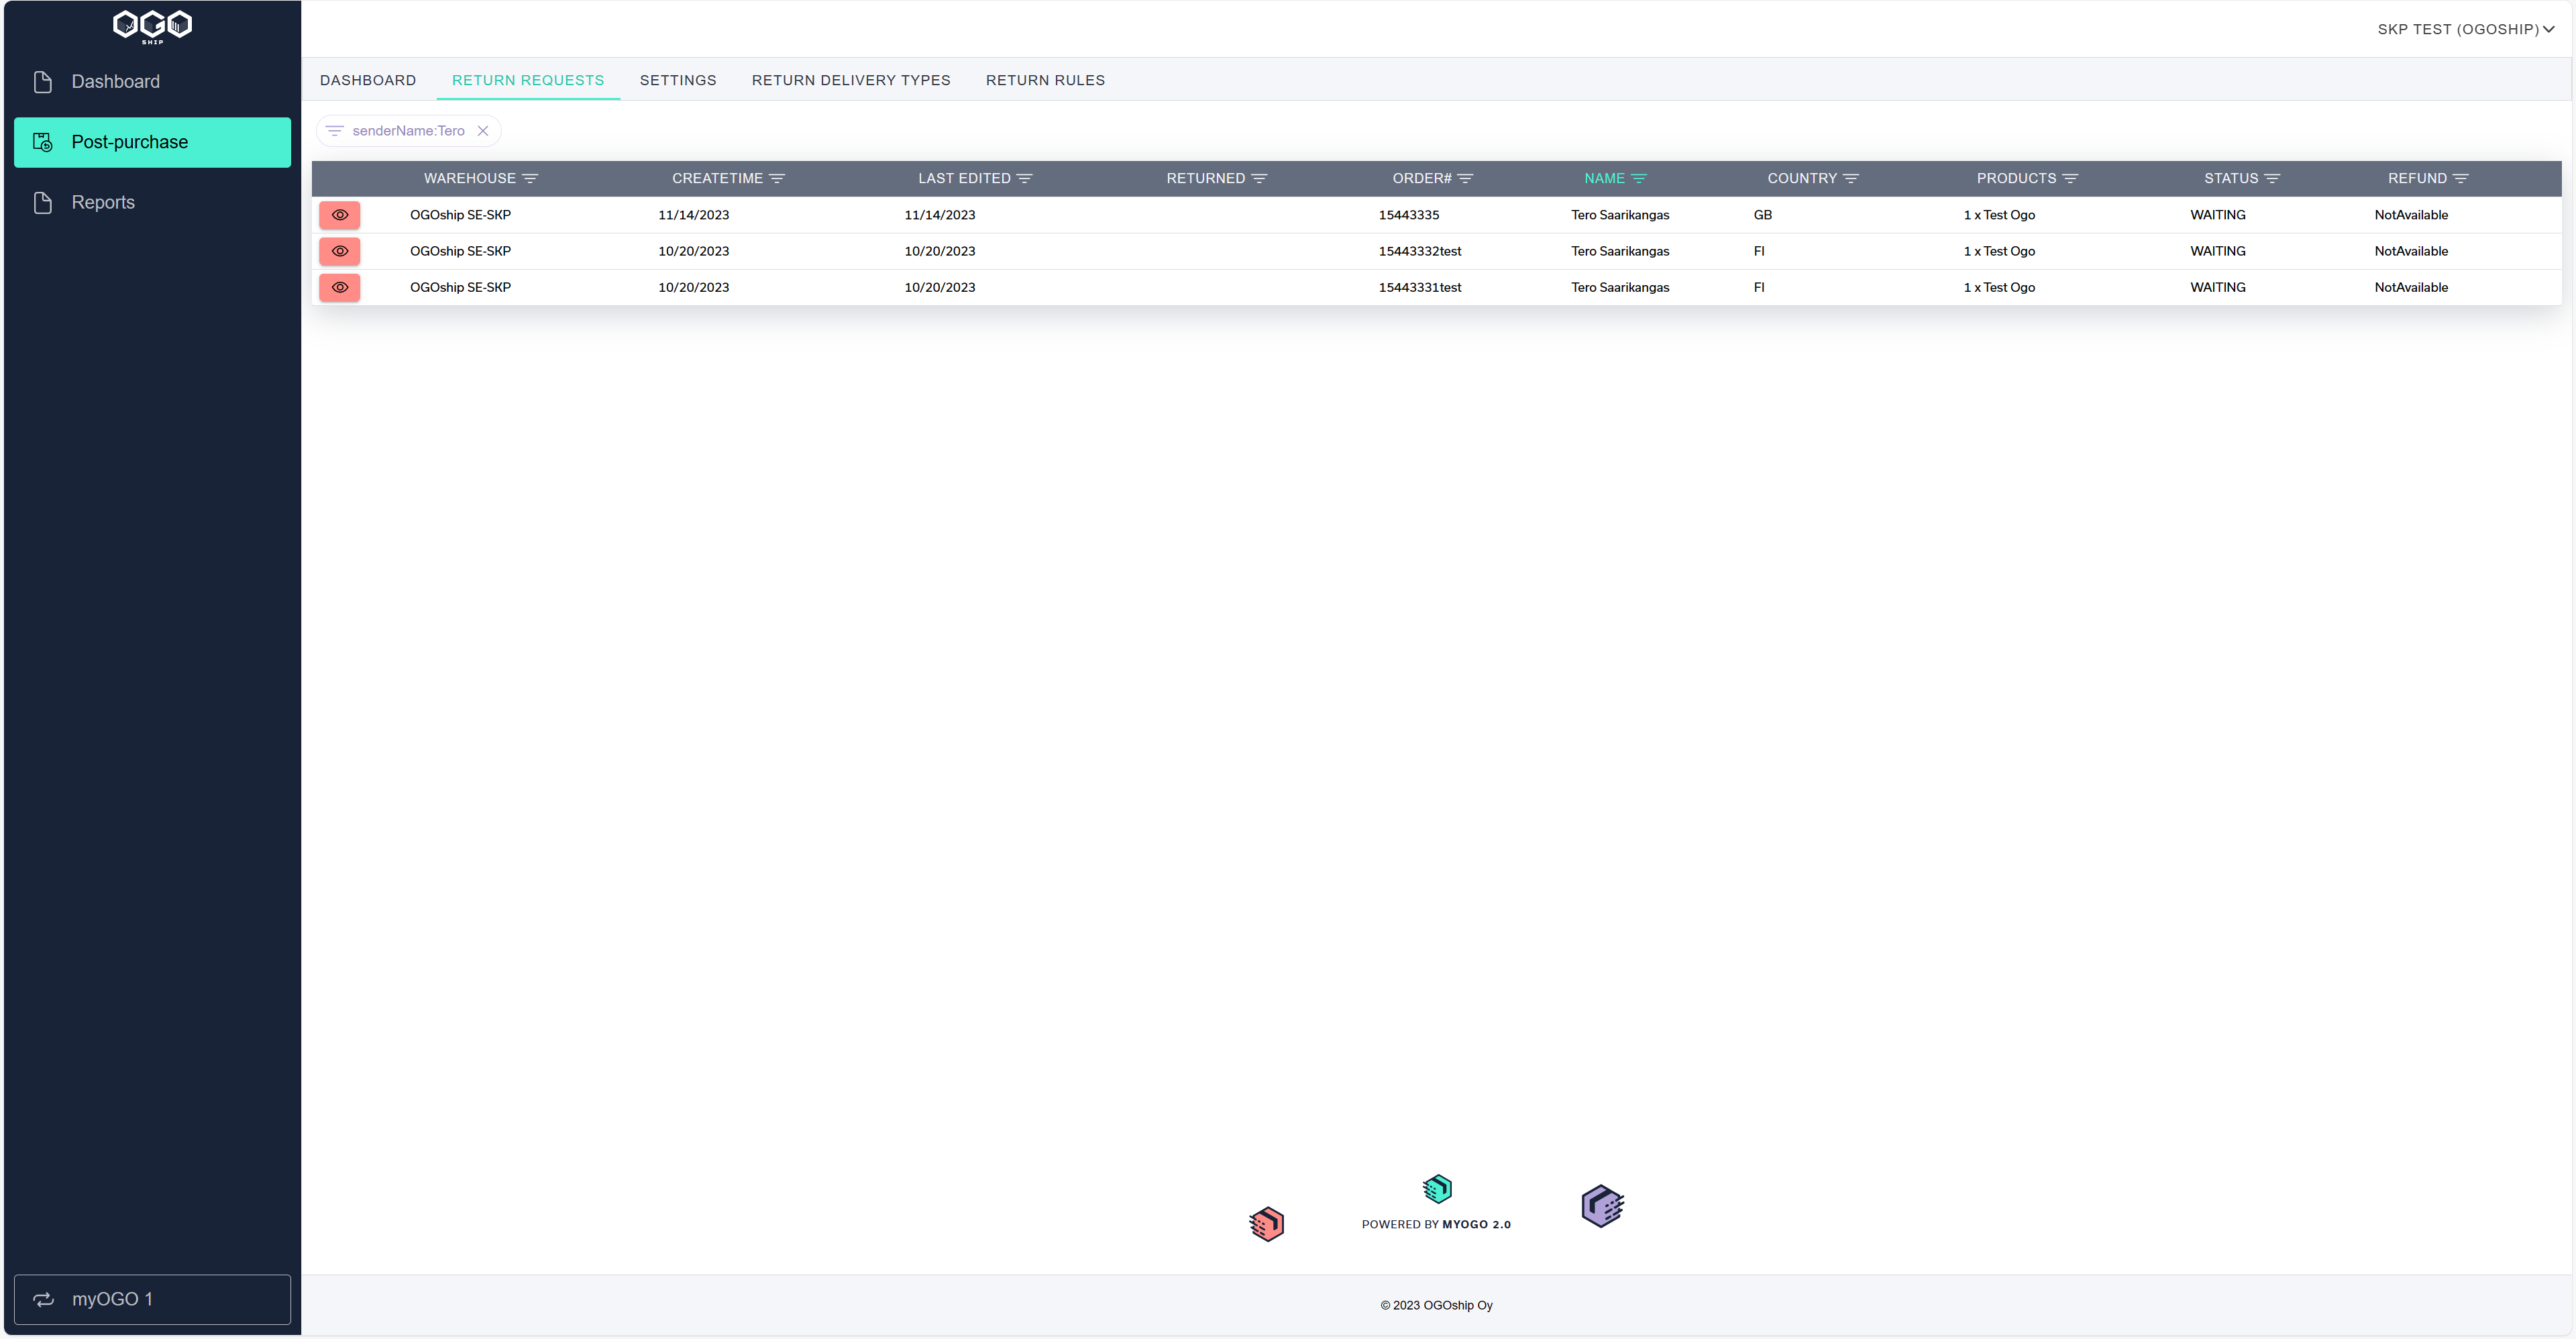
- Return request shows all your return request from myOGO and you view the returns more detailed by clicking the eye icon.
- You are able to filter those to narrow down search by clicking on the specific text with the filter icon. You can also use this page just to mark down refund statuses in case needed after the order has been returned.
4. Post-purchase services configuration
- In the settings you can see your current plan level, in case you wish to upgrade your plan level please contact service@ogoship.com

- Start with adding the return reasons and return rules, the Return Delivery types shows the specific logistics company return instructions that are always included in the message to end consumer.
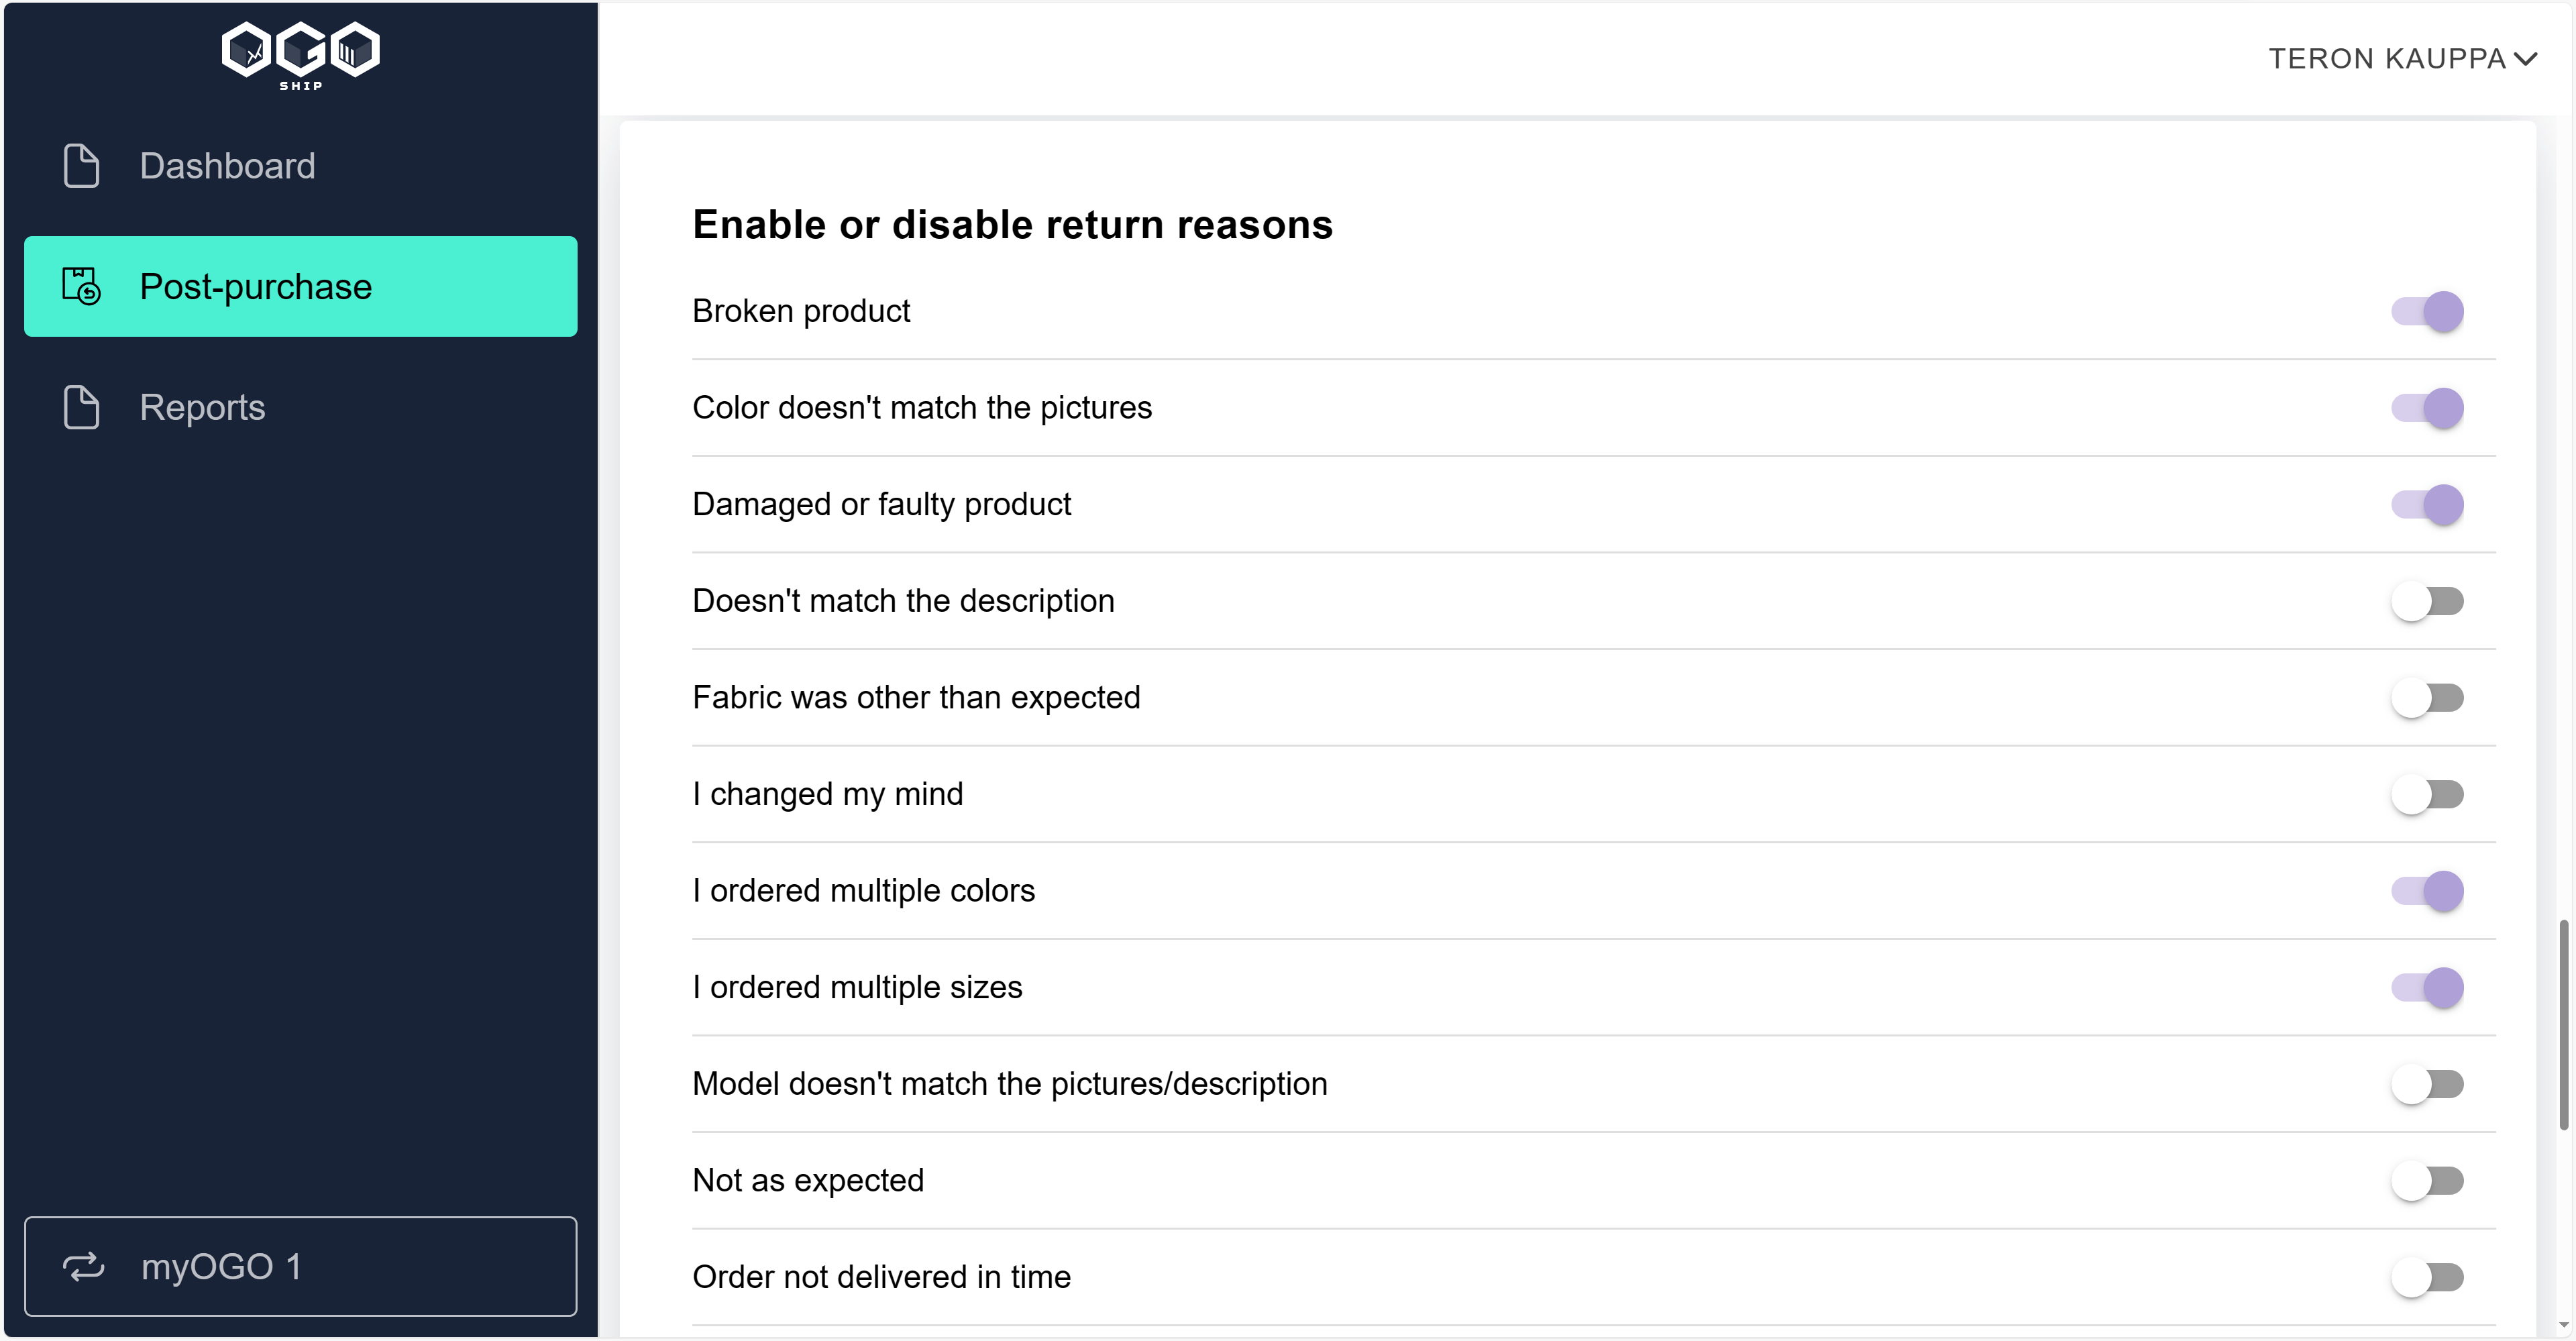
- Return reasons can be enabled from the Post-Purchase -> Settings and scrolling down at bottom of the settings page.
- Return Reasons are determined by OGOShip. If you need additional return reasons, check with service@ogoship.com.
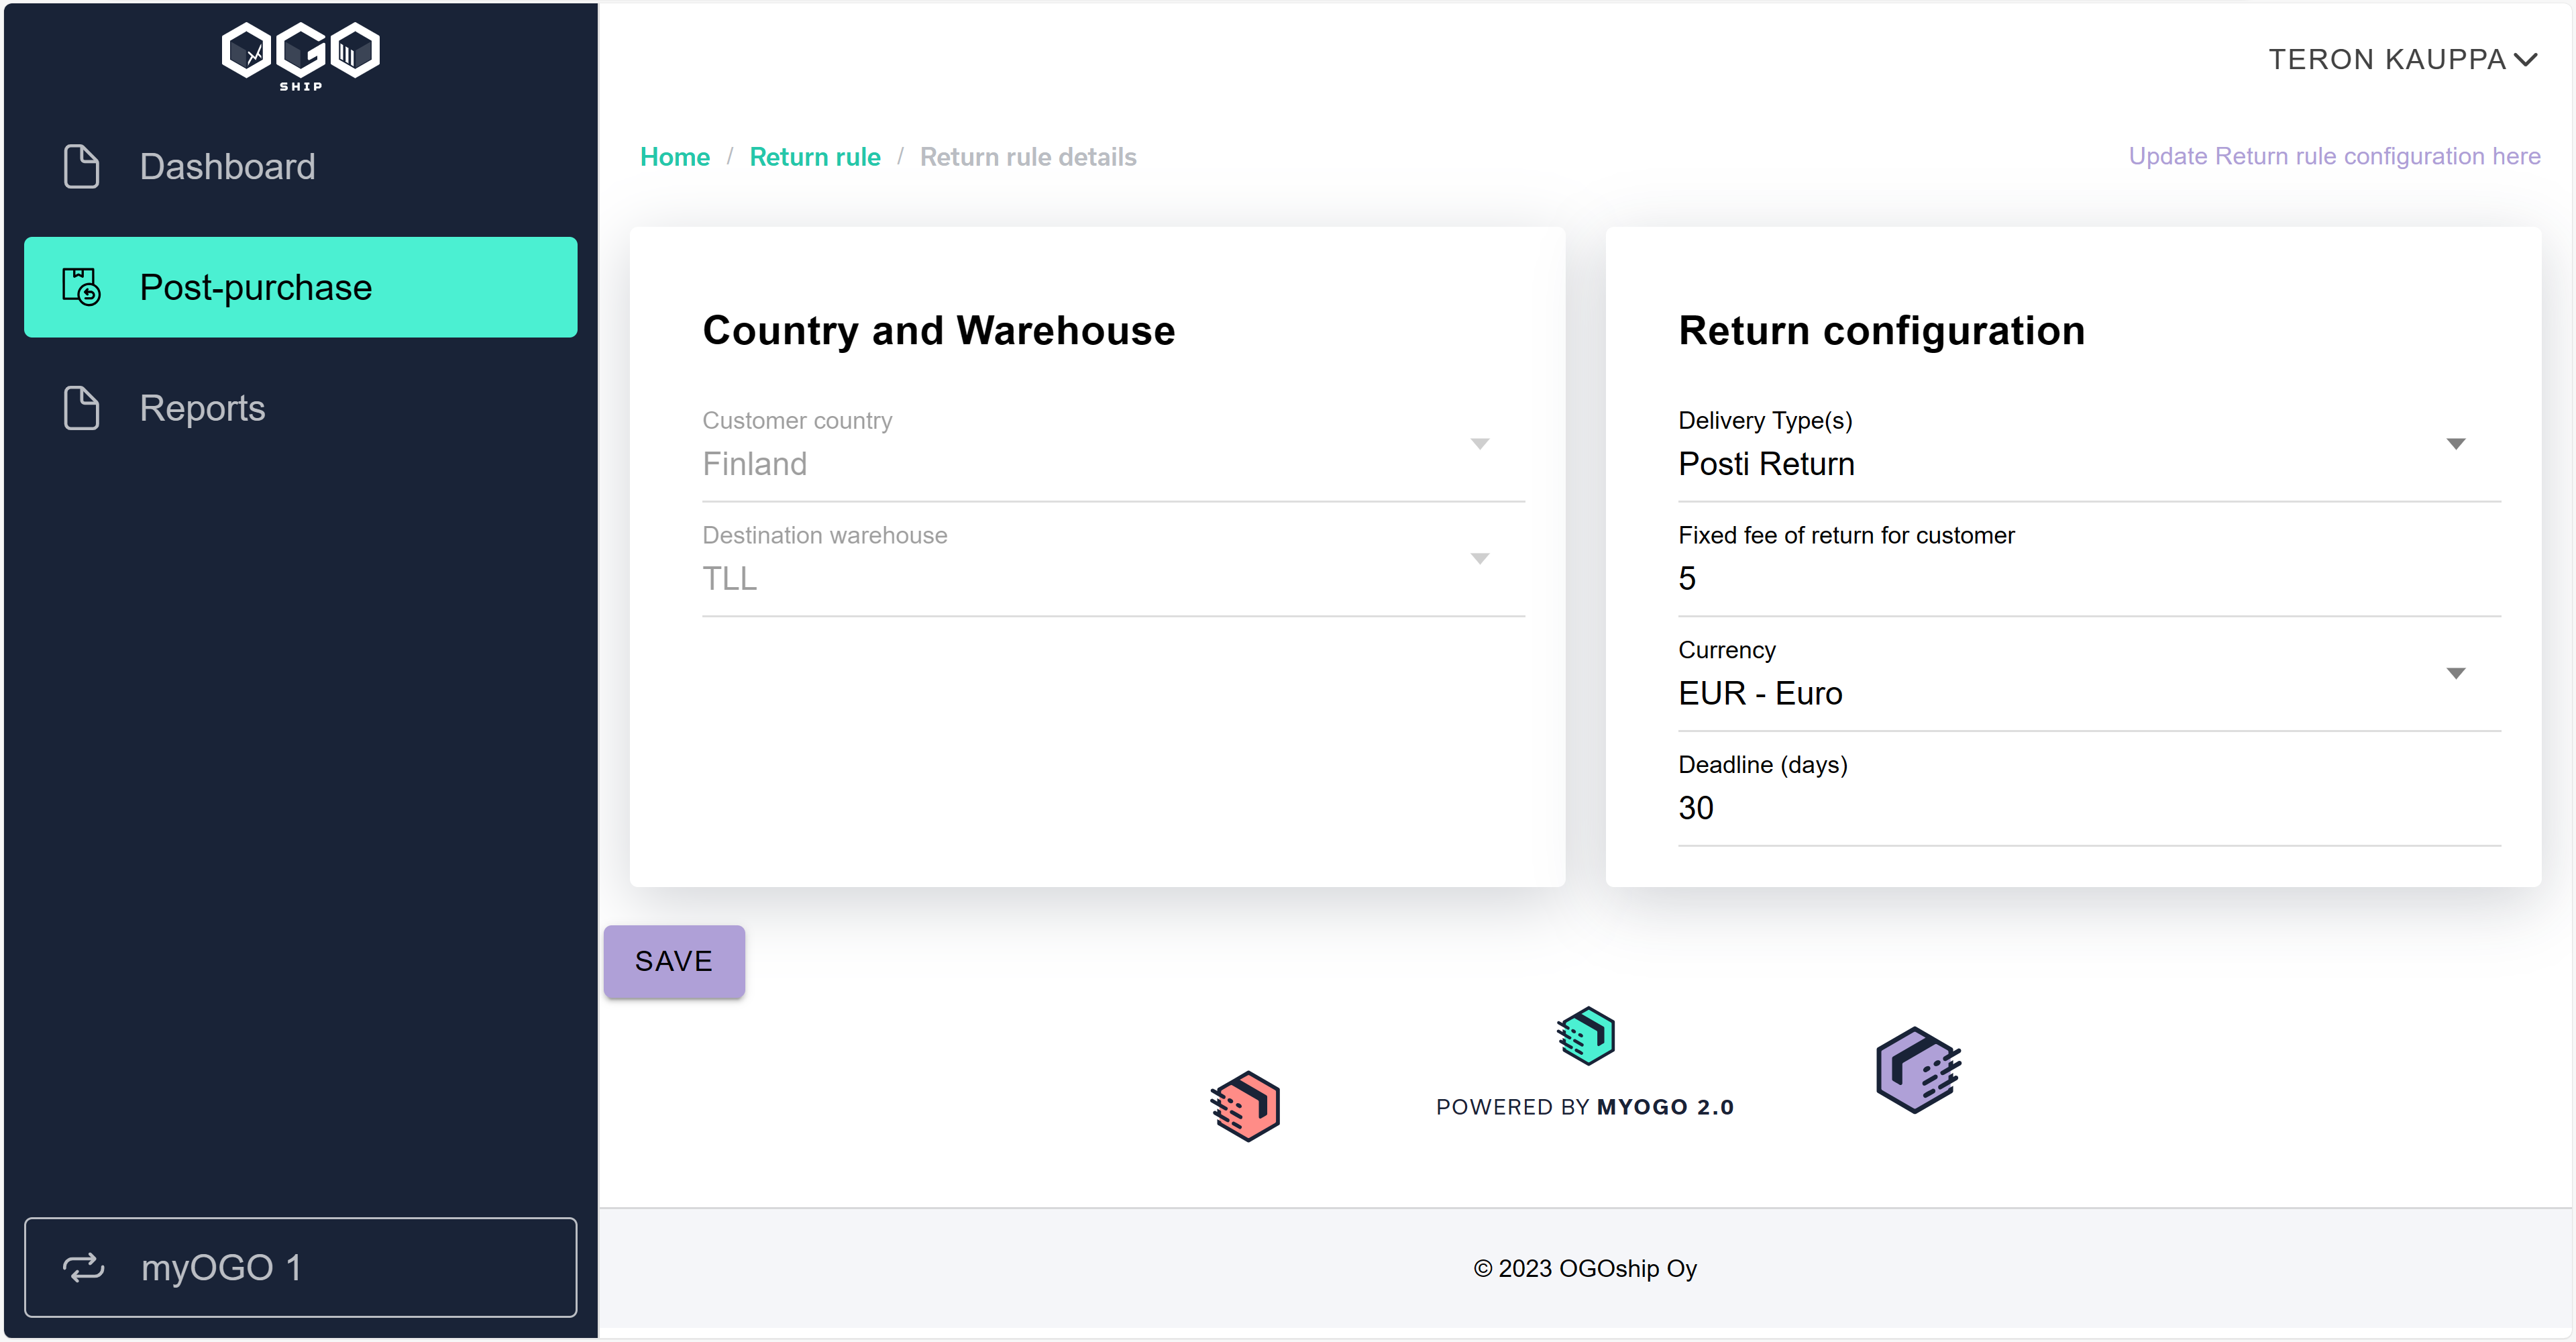
- Next Return Rules have to be created. The rules listing shows all the rules created (if there has been any) and by clicking the + icon in the middle after rules can create new one.
- Each country where you want to accept returns through the portal requires its own rule. These rules are needed to create separately and it enables to setup country-specific conditions.
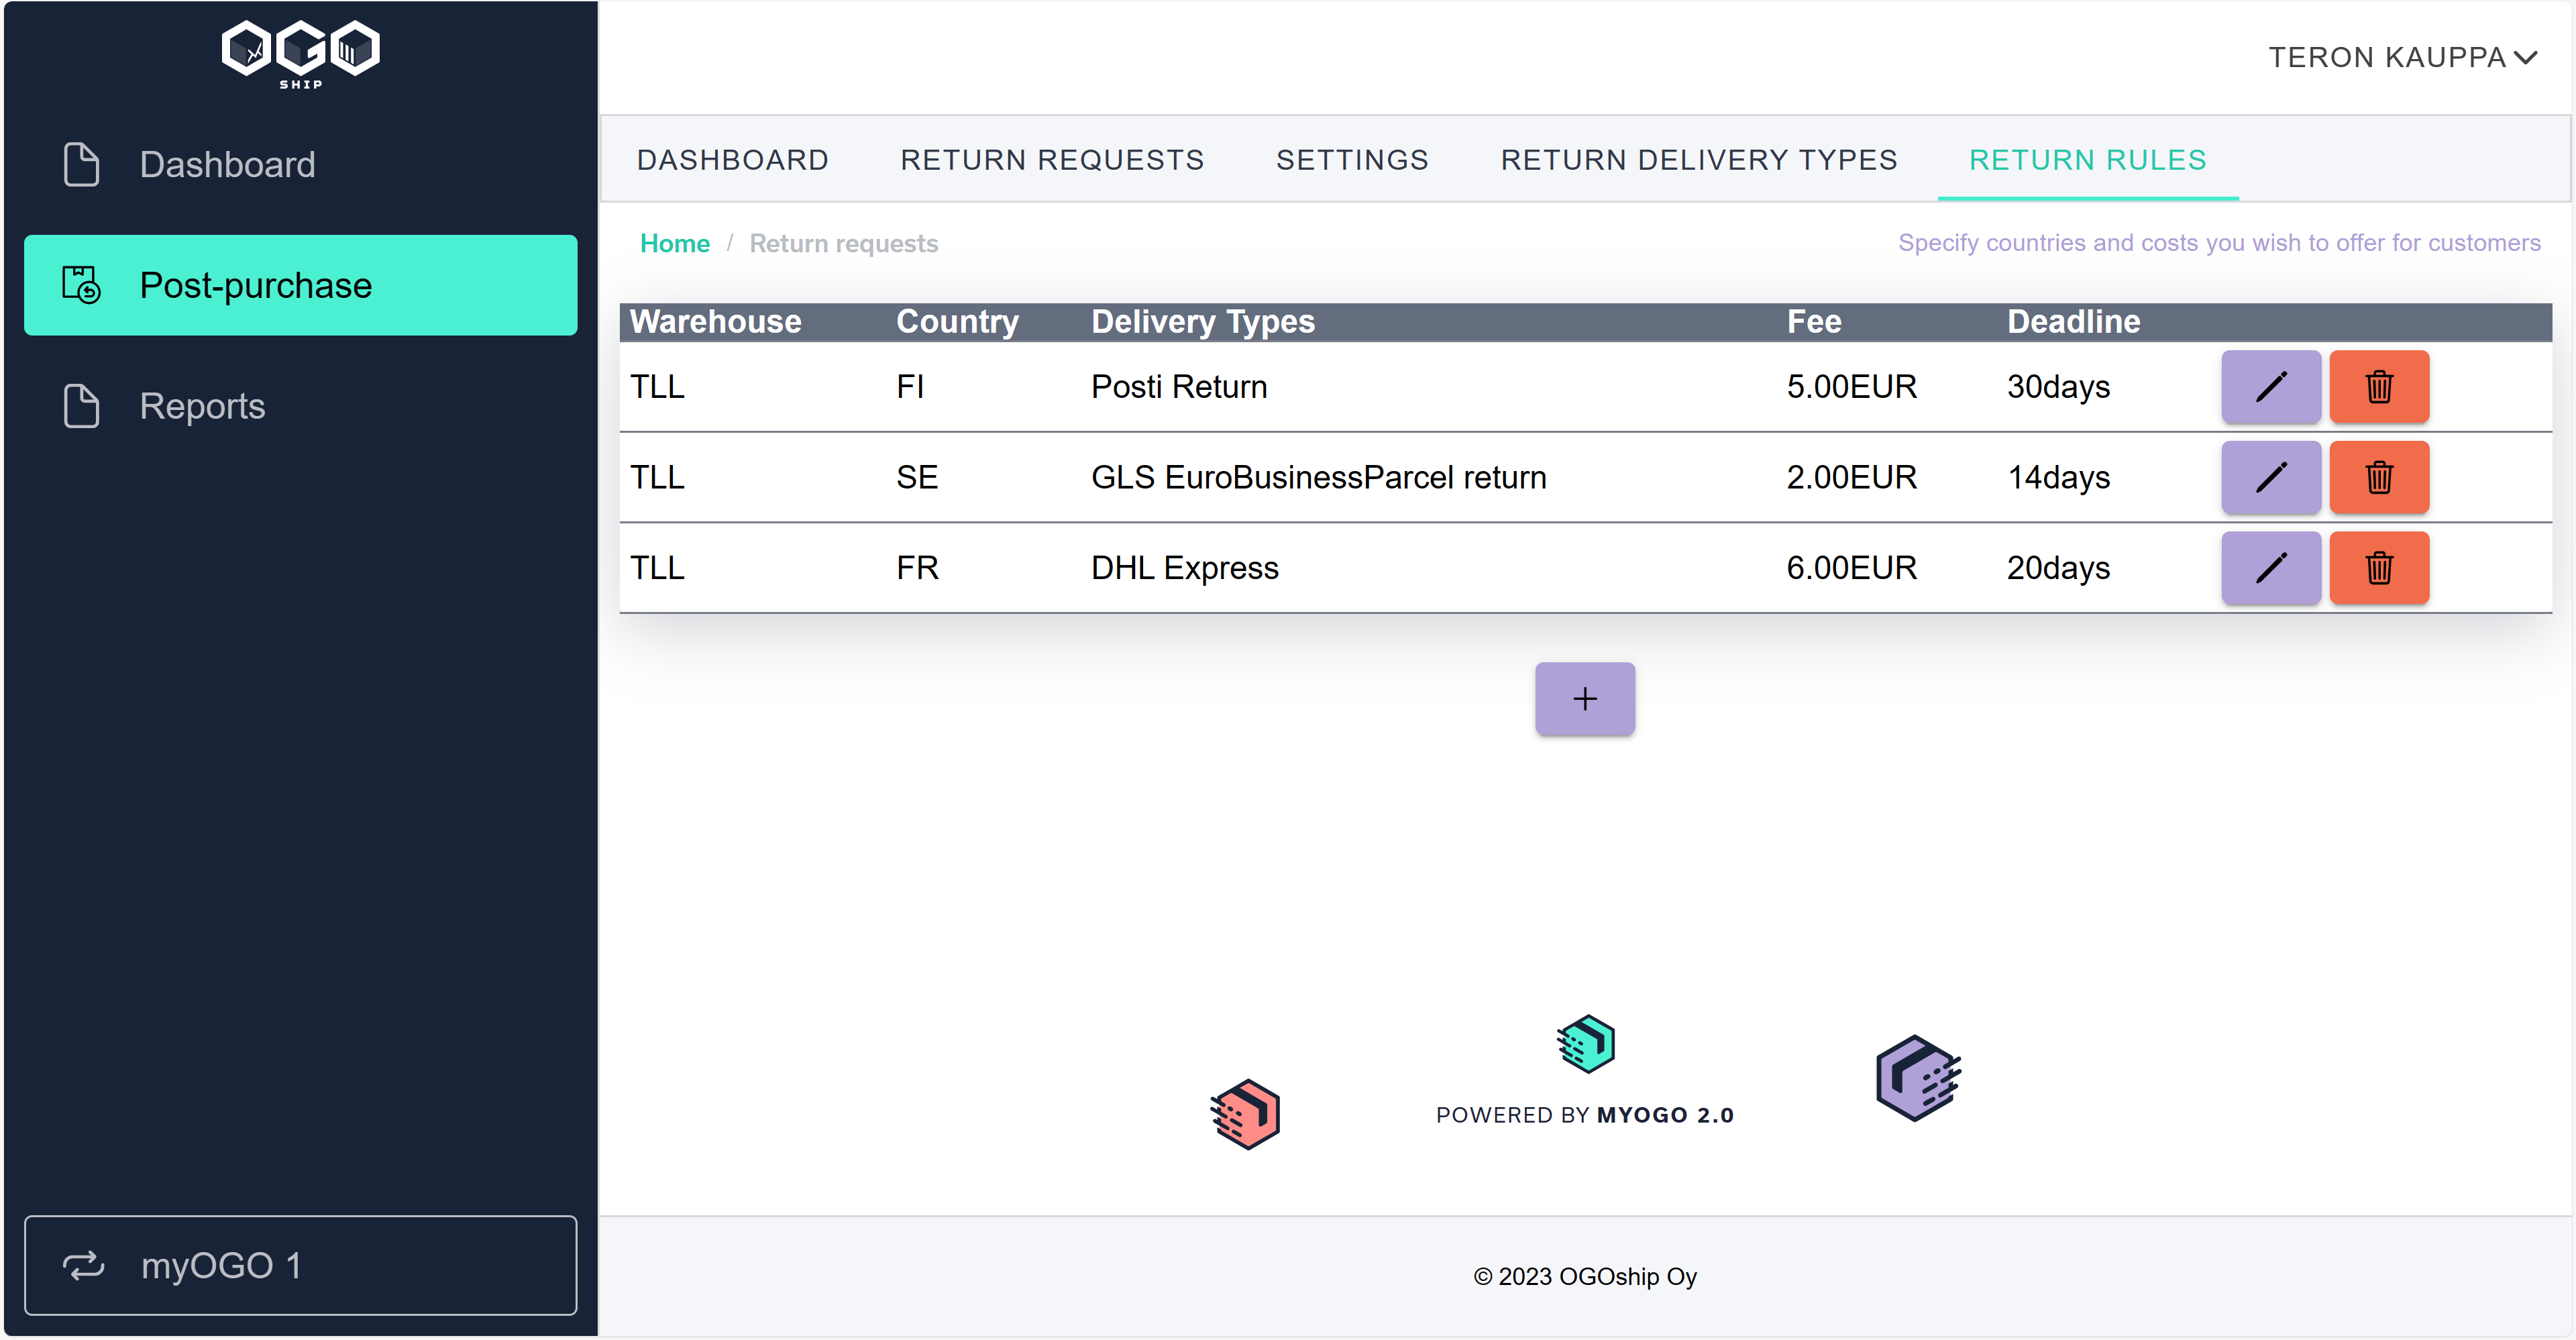
- Choose first the customer country and destination warehouse, after that you are able to choose the delivery type(s) and fill in the rest of the conditions.
- The deadline (days) means how many days after the delivery a return is still accepted to create. This is counted from when the customer has actually received the goods (shows delivered on tracking).
5. Post Purchase Services Messages Configuration
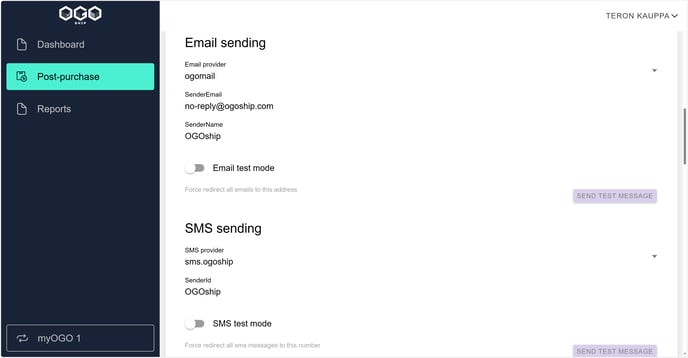
You can check with your onboarding person or from service@ogoship.com for further information about how to configure the email notification frames and templates.- Start with selecting Email and SMS provider from the Settings
- For Growth versions the email is sent from OGOship and the email address should be no-reply@ogoship.com
-
For enterprise versions OGOship recommends using Mailgun which is free up to 5000 messages in a month.
- When all settings are ok. Turn on test mode, fill your email / sms number and click test. You should receive message and see that everything is in place.
- Next Select all needed languages from the Messaging settings and a default language to be used if any translation is missing.
- Save language settings and proceed to actual messages.
- The language is decided by Order language which is also shown on the order in myOGO, if this same language is added in the settings then that will be used. In case the language is not in the settings then the default language will be used.
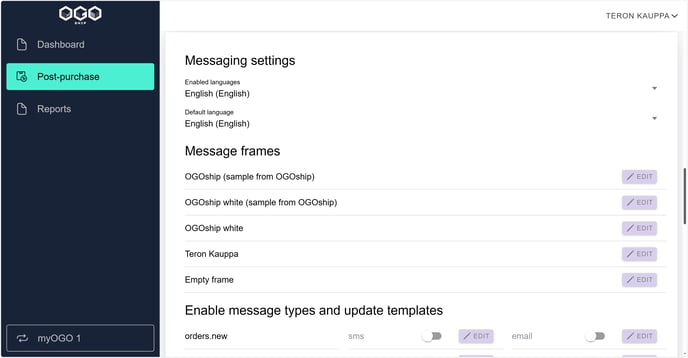
- Message frames contains style and placeholders for other messages. You do not need frame for SMS but it is useful for emails. Please note this is the most technical step taking notifications in use. It is easy to build any message templates after you have done the frame successfully.
- Frame can be also updated later. Changes to frame are not changing actual messages before you have previewed those and saved actual templates.
- OGOship has prepared some frames you can check and modify. For updating templates, ask help from someone familiar with html. Knowledge of liquid can also help. Perhaps web developer working with your shop can help with this one also.
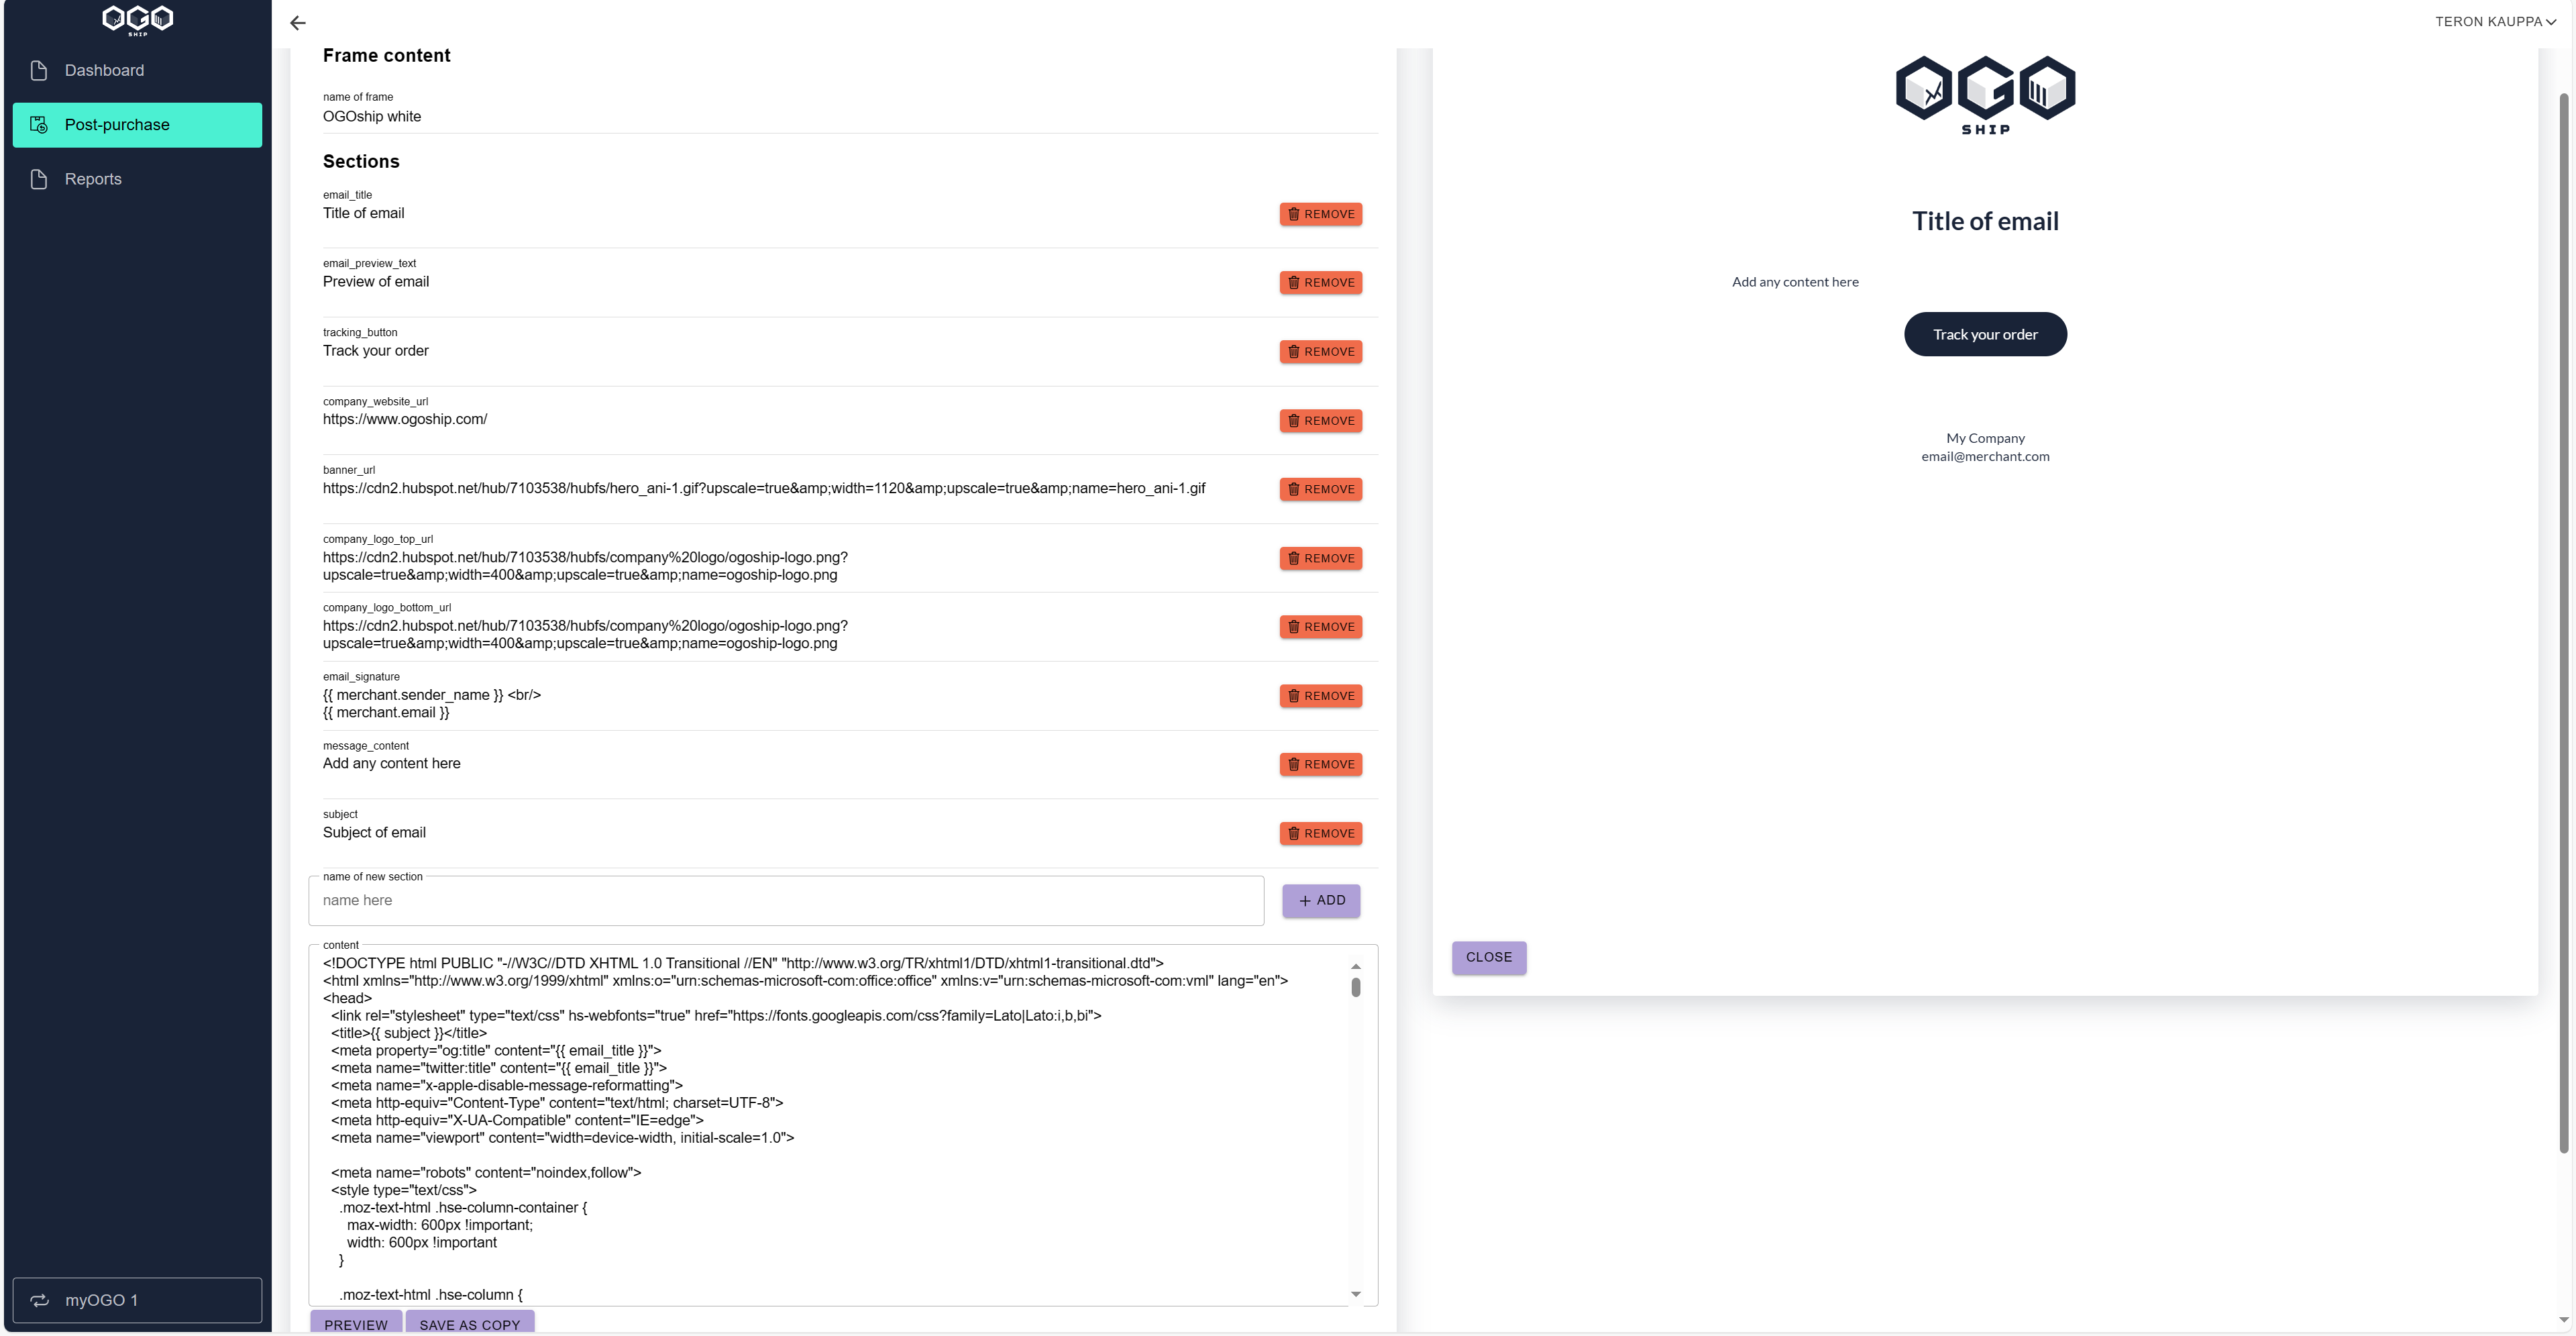
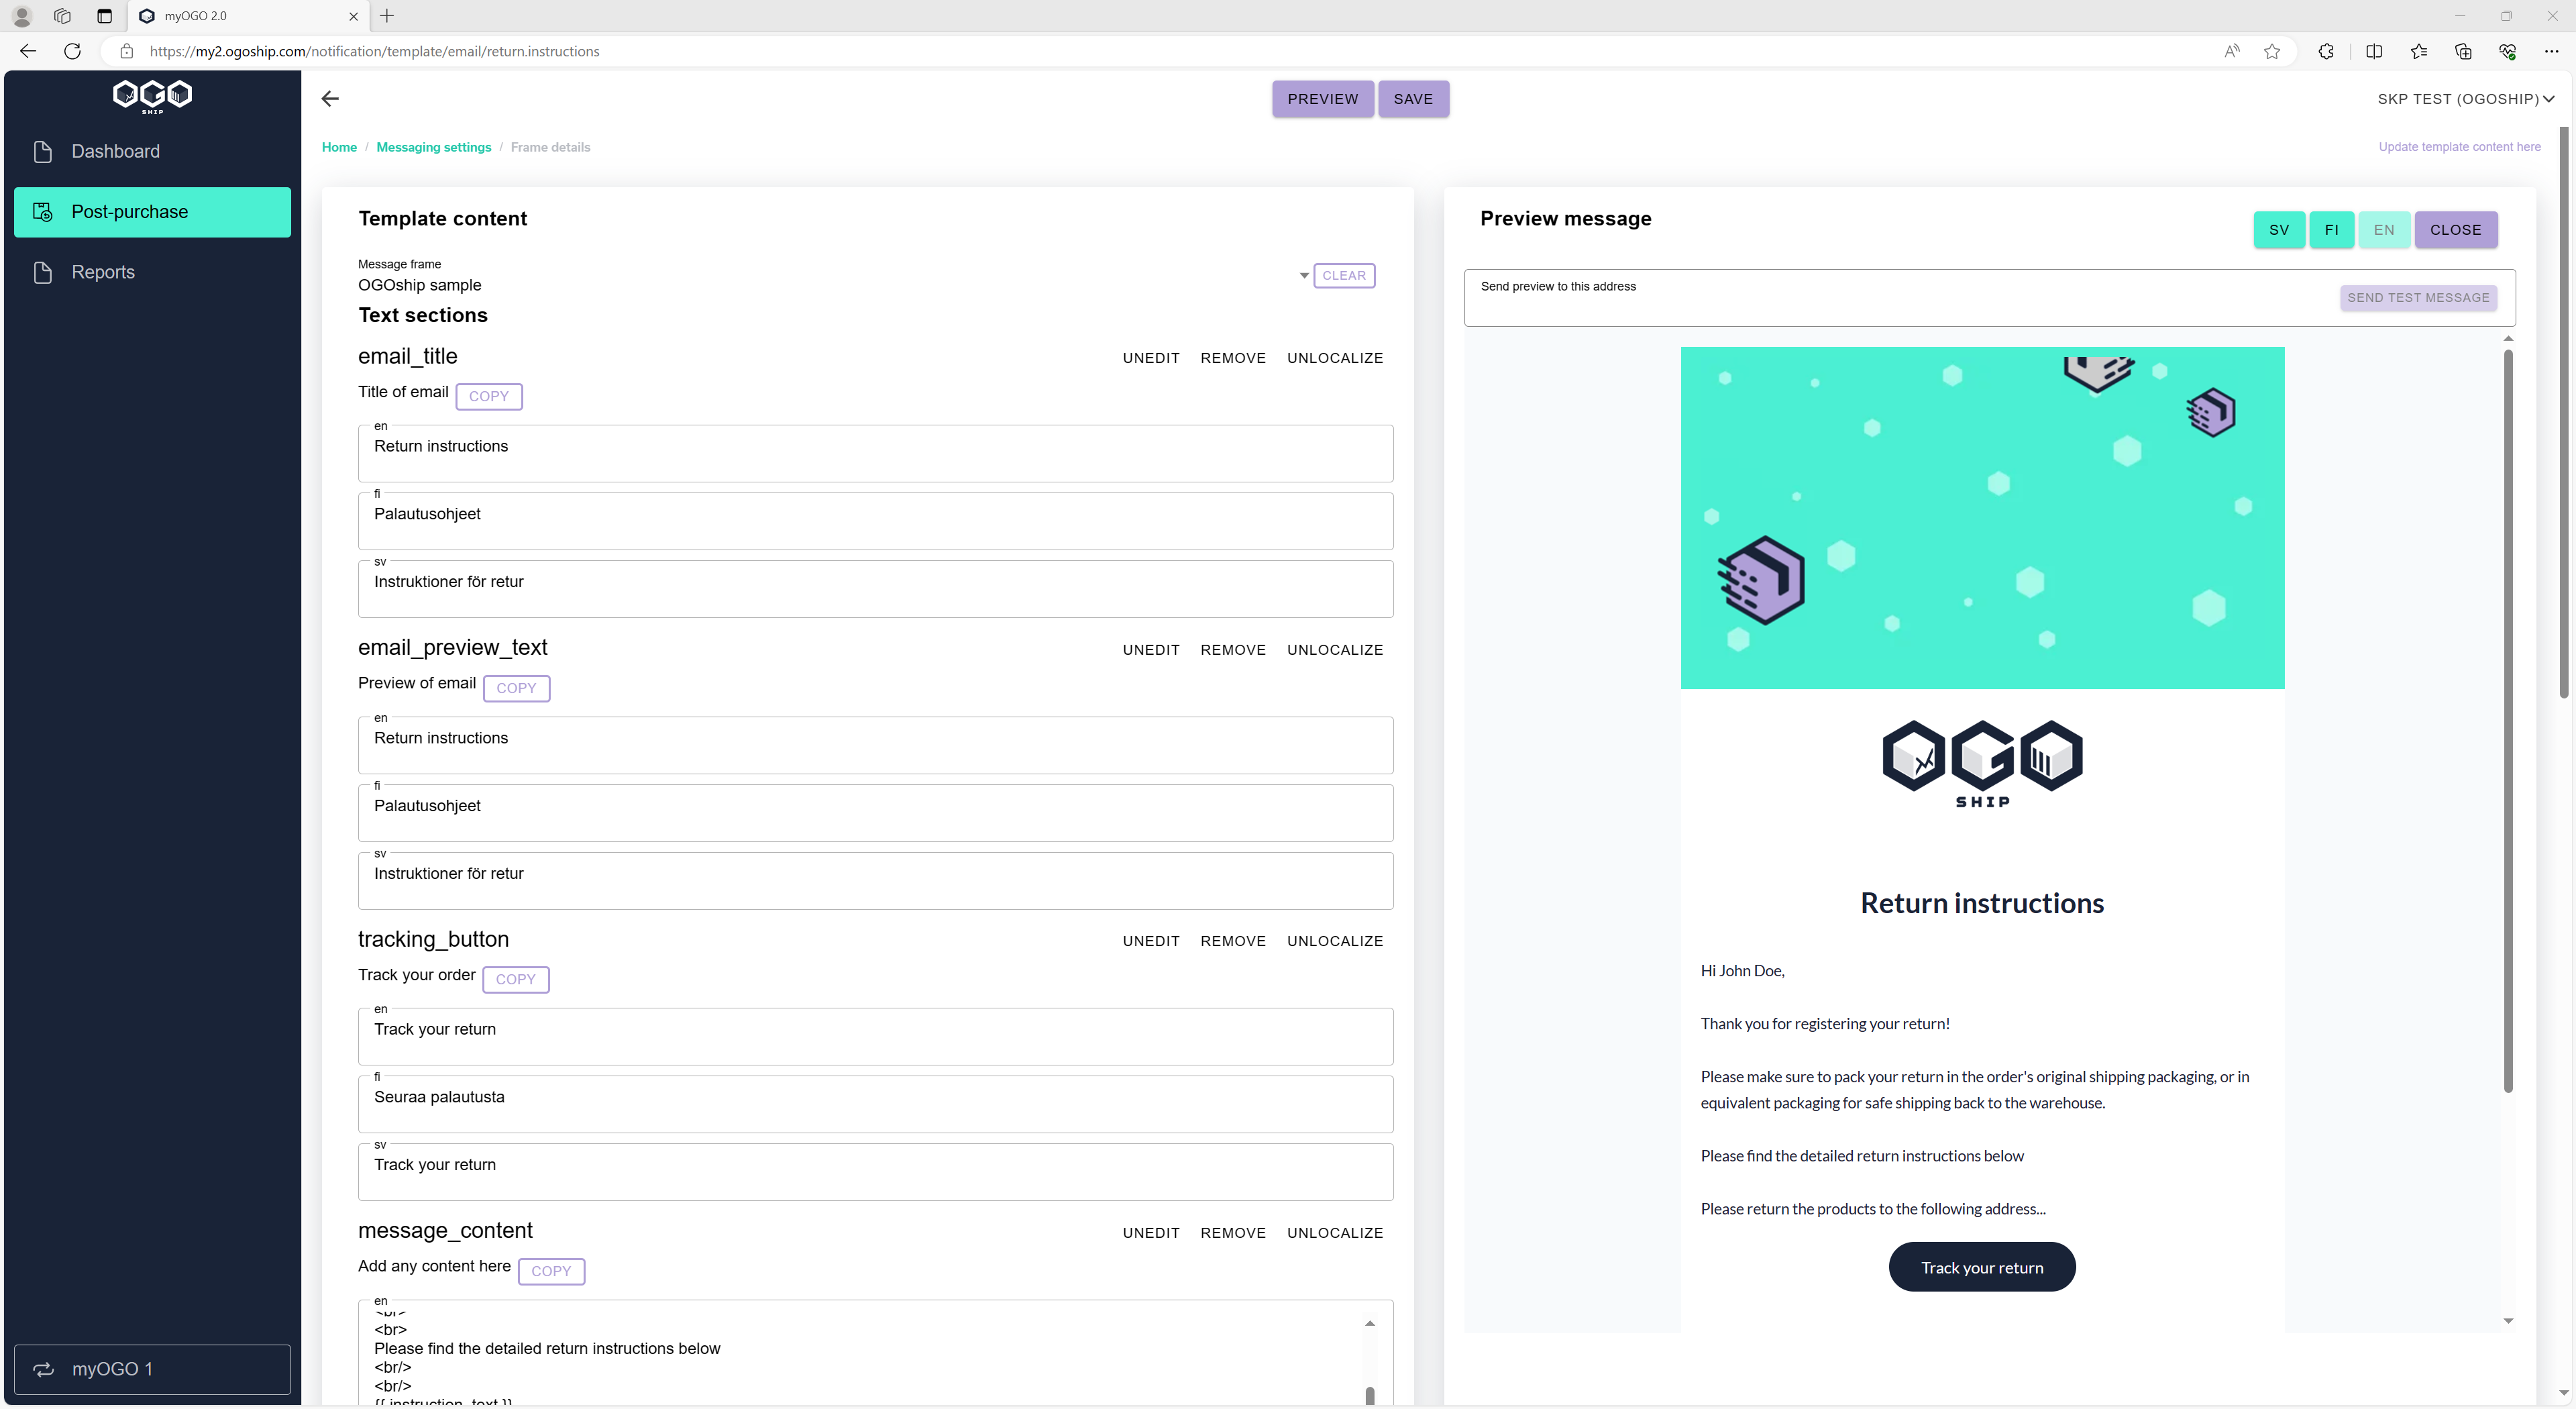
6. Frame editor
Frame contains sections and content.
Section is a placeholder for any link, or text that can be used in messages. Text of section can be localized in later phase.
Subject is special section to be used as email subject.
Content is actual content of message. Content is html which can be extended using Liquid syntax. You can read full details of Liquid from Shopify: Liquid template language (shopify.github.io)
As quick intro. If you write "" in template. That will be replaced by possibly localized text from "my_section" named text section.
We do not recommend using sections inside sections.
You can also use ready specified data like to use automatically your sender name.
Click preview to see sample of your frame.
When you like the frame, then just save frame and move into next phase of actually filling templates.
6.1 Next step is to choose which messages you wish to send
From the list you can enable sms or email messages. When you click edit you will be taken to page to edit template of this message type. Templates must be previewed and saved before those can be enabled from the selection button on the overview.
return.instructions= this sends the return instructions to consumers and it is mandatory to have with the returns
tracking.otp= PIN Code login that consumers enter before being able to view the full tracking details (not required with login not required for full shipment info, see section 8.1)
You can choose which other message you wish to send to customers, new order created, shipped and/or delivered. Please check also from your webstore that there are no overlapping messages when activating the tracking.

7. Template editor
If you are modifying email template then you should start by selecting frame for message.
You will receive all text sections of frame when when frame is selected.
For every text section you can select if you edit text or localize text of section.
Message section has more space as another sections. You can use another sections inside message section also if you wish.
Any of sections you have edited will not loose text if you wish to try another frame. If new frame has new sections, those are added to template also.
When you think you are fine with sections. You can click preview to check message in any of languages selected previously. You can also place your email or SMS number and try actual preview message to your device.
Save changes when you are fine with message in all languages. Remember to enable message also.
8. Feature activation
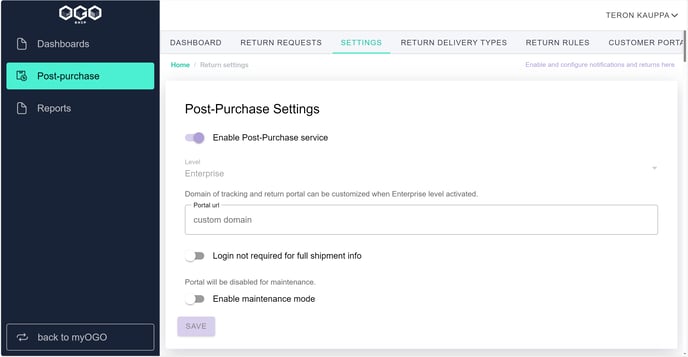
Post-purchase services has additional features that can be activated from the Settings tab depending on the pricing level.
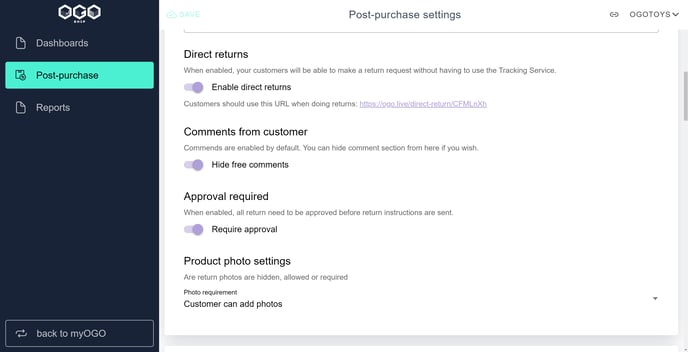
8.1 Login not required for full shipment info
Once activated, then NO PIN code is required to enter from customer from the direct tracking link that is sent to the specific customer. Please note that Direct Returns still requires PIN code.
8.2 Hide free comments
You can hide free comments from customer, this field is visible by default when making the return. Please note that the Feedback field is different that is being asked after the return is made.
8.3 Return Approval
You can book-keep refund status using the returns page. All returns pending refund can be listed etc.
Refunds can be done at any phase of return. Refunds can be done before or after products have returned to the warehouse.
The refund at the returns page is currently just for information and book-keeping. Integrations to webshops (case by case, contact service@ogoship.com for more information) for actually refunding money to customers will be done later.
8.3.1 Return Approvals setup
Subscribe to alert emails
Subscribe from myogo => top right corner User => Email notifications => Enable “New return requested”
Update and enable customer notification templates on Post purchase services
- “return.requested” - Return request is received and waiting for approval by merchant
- “return.closed” - Return request is closed and return label will not be sent.
- “return.instructions” - Return request is “approved” and customer will receive return instructions by email
8.3.2 Return Approvals check & approve
List requests
- List all return requests at “myOGO 2 services” => “Post purchase” => “Returns requests”
- Filter out by status “requested” and go through those requests.
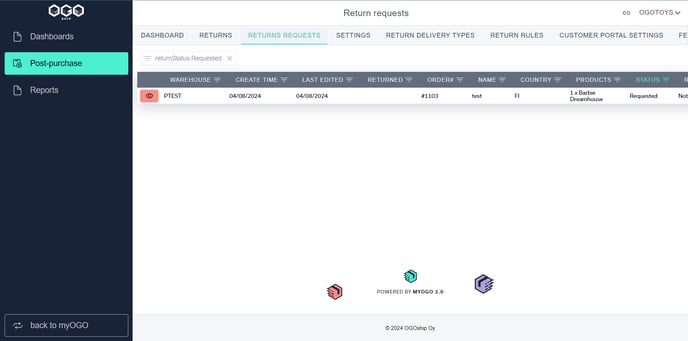
Process request
- Open request
- Verify refund amount and update status if you wish
- Check return reasons and photos (see section 8.4 Product Photo settings)
- Write any final comments to the customer inside the “Result” section. Info is useful when just closing requests. For example when there is no need to return physical products. “No need to return broken products. You will be refunded.”
- Click: Approve (if you wish to send return instructions) or Close (if there is no need for return label)
8.4 Product Photo settings
By default the feature is hidden, you can also choose between that customers can add a photo or that is required to add a photo.
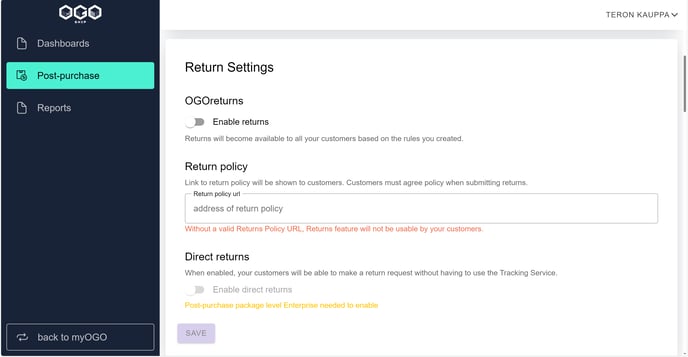
9. Enabling Returns
- You can check the activation with OGOship personnel once everything has been configured, contact your onboarding person or service@ogoship.com
- It is required to have return policy link added before the returns can be enabled as this is a mandatory for the consumers to accept when creating a return.
- Once everything is configured, the returns feature can be enabled. The returns widget will appear on the tracking page, allowing consumers to initiate returns.
Enterprise Version Benefits
Direct Returns:
- Enable this feature from the settings, providing a static link for direct access to returns by end consumers. The end consumer is able to search orders with their email address and/or phone number.
Embedded Tracking Widget:
- Requirements: Merchants need to insert OGOship's script into the Order Confirmation Page.
- The embedded tracking widget is included in the Enterprise plan of OGOship Returns.
- Currently, this feature is available for Shopify only.
- The widget displays crucial tracking details directly on the webstore, increasing visits and the likelihood of repeated purchases.
Own Domain Name or Hosting on Additional Provider (MailGun and MailChimp):
- Configure the system to display your own domain or use email providers like MailGun and MailChimp.
- MailGun is free up to 5,000 messages/month, while MailChimp has a monthly fee.