OGOship has an open API for developers. You can manage orders, products, stock, returns, webhooks and metadata through the API.
Test account and merchant
Please create a free test account and a merchant profile in myOGO before you start.
Start here: the interactive API reference
Everything about the API lives in one place:
➜ https://api.ogoship.com/api/v1/scalar/v1
It is a full, always up-to-date reference and a test client. From that page you can:
- Browse every endpoint with complete request and response models, field descriptions and the numeric values behind each enum.
-
Authorize with any of the three supported methods — API key (
X-OgoKey), Bearer JWT, or the OAuth2 password flow — using the Authorize button. - Send real requests against your own merchant and see the actual response, without writing any code first.
-
Copy ready-made code samples in your language — C#, curl, JavaScript, Python, PHP and more — with the parameters you entered already filled in. C# /
HttpClientis shown by default; use the language selector to switch. - Pick the environment (Production, Beta, Dev) from the server dropdown before sending a request.
To authorize with an API key, open Authorize, choose the X-OgoKey scheme and paste your token. The OAuth2 scheme is preselected and already carries the shared demo client_id/client_secret, so you can also just fill in your MerchantId and SecretToken there if you prefer that flow.
Requests you send from that page are real. Orders you create are real orders. Use a test merchant and a test channel while you are experimenting.
Recommended: create a permanent API key
The simplest and recommended way to authenticate is a permanent API key. It never expires, needs no refresh cycle, and is sent as a single request header.
- Sign in to my2.ogoship.com and select the merchant you want the key for.
- Go to API Keys (my2.ogoship.com/auth/api-keys).
- Click Add API Key.
- Give the key a Name that tells you which integration uses it (for example "Webshop order sync").
- Under Select Channels, tick exactly one channel — see the note below.
- Under Select Scopes, tick the permissions the integration needs.
- Click Create and copy the Token. You can also copy it again later from the copy button on the key's row.
⚠️ Select only one channel for the v1 API
The v1 API works on a single channel. If a key has several channels ticked, the API silently uses only the first one and ignores the rest, so orders and products may end up on a channel you did not expect.
If you need to integrate more than one channel, create a separate API key per channel.
Using the key
Send the token in the X-OgoKey request header on every call. No token endpoint, no refresh:
curl -H "X-OgoKey: your-api-key-token" "https://api.ogoship.com/api/v1/Orders?limit=10"
Creating an order:
curl -X POST "https://api.ogoship.com/api/v1/Orders" \
  -H "X-OgoKey: your-api-key-token" \
  -H "Content-Type: application/json" \
  -d '{ ... order json ... }'
For the exact JSON body of any endpoint, build the call in the interactive reference and copy the generated sample into your code.
Treat the token like a password — anyone holding it can act on your merchant with the scopes you granted. Use one key per integration, and Revoke a key (trash icon) as soon as it is no longer needed or may have leaked. Revoking is permanent and calls using that key start returning 401 Unauthorized.
Which scopes to select
A key with no scopes is rejected by every endpoint with 403 Forbidden, so pick at least the ones you need. Grant the least access the integration requires.
| What the integration does | Scopes to tick |
|---|---|
| Read orders and returns | read:order |
| Create and update orders and returns |
read:order + write:order
|
| Read products and stock levels | read:product |
| Create and update products, send stock updates (purchase orders) |
read:product + write:product
|
| Manage webhook subscriptions |
read:webhook + write:webhook
|
| Read and write metadata |
read:metadata + write:metadata
|
If a call fails with 403 Forbidden, the error message names the scope that is missing and lists the scopes the token actually carries. The tracking:read scope in the picker is used by other OGOship services, not by the v1 API.
API endpoints
The following endpoint groups are available:
| Group | Endpoints |
|---|---|
| Orders | Search, create, update orders |
| Products | Search, add, update products |
| Stock | Search stock levels |
| StockUpdate | Add stock updates (purchase orders) |
| Returns | Search, create, update returns |
| WebHooks | List and add webhook subscriptions |
| Metadata | Get, update, delete metadata |
See the interactive API reference for request/response details on each endpoint.
WebHooks
You can find webhook models in the API reference. API calls will have a "X-OGOship-Hmac-SHA256" header.
It will contain body of message HMACSHA256 calculated using Webhook key. Hash is then saved to header using Base64 encoding.
C# implementation:
var bytes = Encoding.UTF8.GetBytes(webhookSecretKey);
var hmac = new HMACSHA256(bytes);
var hashString = Convert.ToBase64String(hmac.ComputeHash(Encoding.UTF8.GetBytes(data)));
Alternative: OAuth2 token (legacy)
The API also accepts a JWT obtained through an OAuth2 Resource Owner Password flow. This is the older method and is kept for existing integrations — new integrations should use an API key instead, because the JWT is valid for only 1.5 hours and must then be refreshed. The refresh token is valid for 2 weeks and for one refresh; a new refresh token is returned after each refresh.
Use https://my.ogoship.com server for token requests. We only support form data and parameter data types (not json currently) for generating the token.
curl https://my.ogoship.com/OAuth/Token -d grant_type=password -d client_id=123456 -d client_secret=abcdef -d username=[merchantId] -d password=[secretToken] -d scope="read:order write:order read:product write:product read:webhook write:webhook read:metadata write:metadata"
The resulting token is sent as Authorization: Bearer <token>.
You can test everything with a demo account client_id/client_secret = 123456/abcdef. Before you go live, request your own client ID & secret via email from our Tech team.
When authorizing the OGOship API in Scalar:
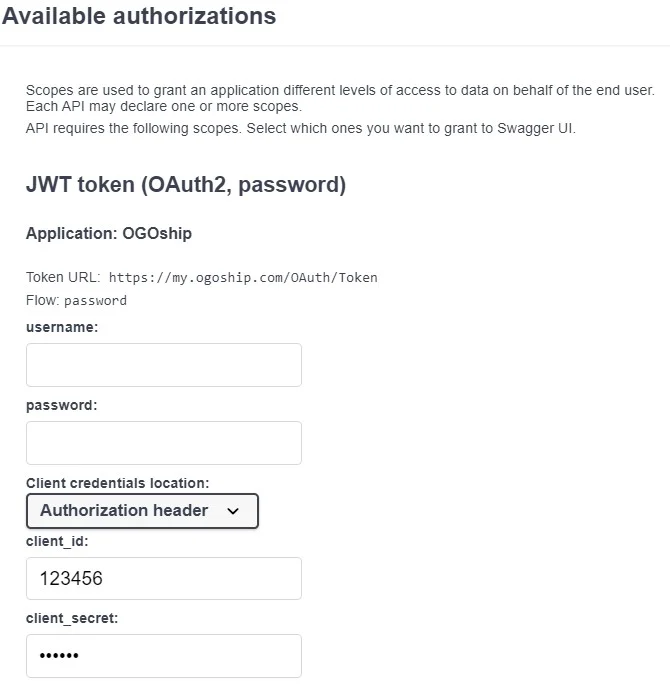
The username & password for that flow are your MerchantId and SecretToken, found in your myOGO merchant under Edit Merchant --> Integrations --> API Information. 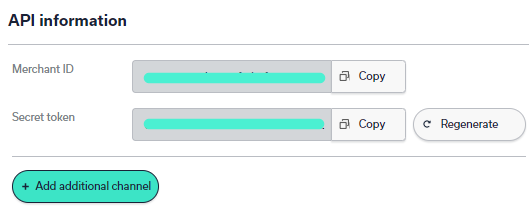
💡
In case of any issues, please email our Tech team for assistance.